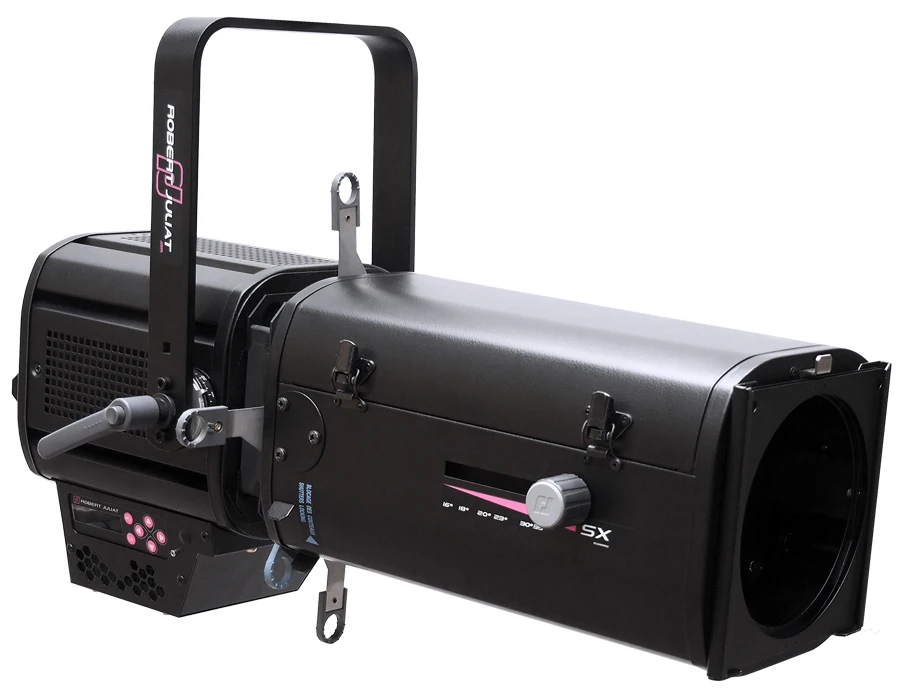
Robert Juliat presents its brand new LED module, Sully 4C RGBL. Very flexible, it brings color to the Sully range by revolutionizing the way of understanding the mixing of shades to obtain the color which best meets your needs.

A bit of history
Robert Juliat begins a great story by giving his name, in 1919, to a company whose lights were entirely dedicated to cinema. He was already a visionary since in 1923 he developed the first PC (Plano Convex)which made it possible to highlight intermissions in cinemas, this fixture is still a reference.
It was in the sixties under the leadership of Jean-Charles Juliat that the shift to stage lighting began and the Robert Juliat company continued to grow under the direction of François Juliat by offering innovative products of very high quality.
Looking into the future

The Sully 4C range is a historical continuity of the French brand. Developed with the same intention as the monochrome range, it offers a Profile, a Fresnel, and a retrofit hatch, based on a 200W RGBL (Red, Green, Blue, and Lime) LED source. After the white version that appeared in 2020, Robert Juliat announced the color version in May 2022, and another year was needed for the R&D to get closer to perfection.
The advantage of the Sully 4C hatch is that it fits into your 600SX halogen Profile in place of the lamp following the same principle as the white module. However the increase in power to 200 W has slightly changed its dimensions.
For optimal heat dissipation, a second fan has been added which raises the overall height of the color module.
It will therefore be necessary to remove the metal plate positioned above the halogen source and replace it with the one supplied with the Sully 4C kit. It is possible to keep the original optics of the source but, for better performance, it is advised to upgrade to the new version, which benefits from an anti-reflection treatment; the gain in brightness is approximately 10%. On the other hand, you will have to remember, if you return to the halogen version, to also return to its original lens because the treatment will not withstand the heat. The switch is very simple and quick.
How to install the Sully 4C module in a Robert Juliat halogen Profile :
One of the major challenges of this retrofit module was to adapt an RGBL matrix to optics designed several decades ago. Initially the R&D team went with a standard LED matrix but after several tests, however the result did not meet Rober Juliat’s quality requirements. There was a problem with the colors themselves but also with the homogeneity of the sources in the present and for the future.
All sources should produce the same colors when they leave the factory, but also after several years of use. We therefore had to start from scratch and develop a specific matrix. If we pay attention to the LEDs that light up, the Lime has been coupled with 2 Amber LEDs which are not mentioned. The other point that delayed the release of the Sully 4C source is the overlapping of 2 projects during the development of the module, the integration of color, and a long-term project on color management.
The SLU Innovation Award
The Sully 4C module brings two major (R)evolutions, each as important as the other. The first, on DMX control, which we will see a little later and the second on color management. The Juliat team’s feat was to completely dissociate the color rendering from the console used.
Indeed, each console has its own way of managing color parameters, and depending on the controller used, the hue, with equal values, is not identical. Likewise, there are variables, such as the temperature of the matrix, which modify the color mixing and which the console does not know.

This is why the R&D team created a color management engine in the fixture which is capable of managing all the data in real-time and offering a result as close as possible to the desired shade whatever the console. This is the main reason why I do not recommend, even if it is possible, the use of RAW mode, color by color, because, on the one hand, the brain is not capable of creating the combinations of all the tints and on the other hand, we completely miss out on the power of the LED engine.
I encourage you to favor RGB or Hue-Saturation modes for classic methods and especially the XY mode. The latter allows, if you use sources from another brand, to take XY colorimetric readings on a fixture and transfer them to the Sully 4C in order to obtain the same color. The result is truly astonishing! Of course, quality, spectrum extent and homogeneity are not possible without calibration of each source. A process was therefore created at the Robert Juliat factory with an integration sphere to measure and calibrate each module.


Controlling
On the power side with the 4C module (or the white module) we have gained in simplicity with Neutrik powerCON TRUE1 In and Out connectors for power, depending on the power source, we can daisy-chain up to 10 Sully 4C on a 16 A line at 230V, 7 on a 15 A line at 110 V, 10 on a 20A line at 100 V.

Data, for the moment, use 2 DMX-RDM XLR 5 In and Out connectors for the DMX-RDM protocols.
A small LED indicates the status of the protocol. On “Out”, if the LED is off, there is an error. On “In”, if the LED is red, there is no signal, green the DMX signal is detected, blue the DMX and RDM protocols are present: it is practical for checking at a glance the DMX status.
Another important point to note is that the Sully series is the only source containing an RDM node. It is therefore possible to configure all the fixtures connected to the DMX output. The LRRP protocol has also been implemented, it allows you to find the IP addresses of all fixtures via the RDM.
All these developments are made in collaboration with City Theatrical which has developed functions not planned at the start of the DMXCat project. We can see that another location is present but blocked. The R&D team is working on adding ArtNet and sACN protocols and an RJ45 connector will be offered later. A Lumen Radio receiver option is also expected to arrive soon.

The menu is complete and well thought out. While on the white versions, the display and its 6 control buttons are optional, on the 200 W color model they are standard. You can control everything from the display to DMX, or RDM.
You can of course take control of the fixture manually and manage all the features with modes 1, 2, and Stand Alone.

Regarding DMX control, we approach the first (R)evolution. With LED sources we almost always find ourselves with a very large amount of modes to satisfy all users. This often involves a complicated choice when patching and a lack of flexibility during use. Robert Juliat’s team decided to develop 4 DMX charts capable of responding to 99% of users and 2 for special cases where color is not managed.
The only difference between the 4 modes is the color management mode. As we saw previously, there are mainly 3 interesting modes, Full – HS, Full – RGB, and Full – XY. With any of these 3 modes, all operators can program a show while maintaining their programming method. You can work on a white base, add filters, and even create transitions between color presets. We can work with color mixing.
You can modify the source type and its behavior. The most important thing is that you can change everything at any time without having to change the control mode (except, of course, the color management mode) and therefore without modifying the console patch.
I had thought about this problem by saying to myself that we could give each mode the maximum number of channels by placing the same functions at the same addresses and leaving channels unused, but this is much better since you can do everything in the same show without changing anything.
Another feature that proves that the R&D team has gone in depth is the possibility of assigning a User ID number to each source.

The Sully 4C module offers many possibilities and it is important to read the manual to understand and make the best use of the range of possibilities available. The first thing to know is what type of source you want to work with. If you want to work in White, you go to channel 7, “Source type”, where you have the choice between, “calibrated white” which is the reproduction of a high-quality white source in 3000 K, 3200 K, or 6500 K, and the Generic CCT mode, if you want a white source with an adjustable color temperature (CCT) from 1700 to 10000 K. You can favor the output (CCT – High Brightness) or the quality of the light (CCT – High Quality).
If you want to create color, on the same DMX channel, you select the 3rd option, Color Mix, where you have the choice between brightness and quality. It is then essential, if you opt for this solution, to choose the type of color management, RAW, RGB, HS, or CIE XY. For RGB and Hue Saturation modes, there are 4 color types, ProPhoto, REC. 2020, SRGB-REC or Native, to test and choose according to your needs in channel 6, “Control Mode”.
If you work in photo or video, this option is very interesting since it allows you to harmonize the color types of the light and the cameras. This range of options may seem tedious at first, but you get to grips with it very quickly and it allows you to obtain a very impressive range of whites and colors with perfect homogeneity on all Sully 4C sources and future sources from Juliat.

Since we are in color, let us highlight the enormous work that has been carried out on the channels dedicated to Gels. There are no less than 6 DMX channels! We first choose the type, Numéric, Chroma, Cosmetic, Dalis, or Raw.

We then select one of the references corresponding to the type. With these two parameters, we have more than 300 Gels. If you are in one of the Calibrated White or Generic CCT modes, two parameters allow you to adjust the Saturation and the Transmission of the hue.
The last two channels are dedicated to the transition between two colors with a duration between 0 and 25.5 seconds and one of 5 transition modes. The last color channels are the 16-bit CCT, a temperature corrector that allows you to go from 1700K to 10000K and the Delta UV for an addition of magenta or green.


We obviously find the traditional parameter of any conventional fixture, the dimmer, but in 16 bits and with multiple options (such as adjusting the response time of the filament). We will be able to modify the curve between Linear, Square, and Tungsten, but also the response time, always with different curve options.
We can even make a difference between a “bump” (dimmer variation less than 50%) and a flash (dimmer variation greater than 50%) where the time delay will then be 0 s.

The DimShift function varies the color temperature depending on the dimmer level, as on conventional sources fitted with gels. It is available for Tungsten and Generic CCT modes. Of course, it has no use in Daylight or Color modes. Another function, the strobe uses 2 channels and you can work on the speed and duration separately. I don’t know if I missed it or if it’s a point that will come up later, but I didn’t find an interesting random strobe to simulate a storm effect in a play and, possibly, some strobe with delay on up or down. Finally, we understand if we are in Color Mix mode and depending on the mode chosen, the XY, RGB, HS, or RGBL parameters.
Let’s turn it on!
It’s all well and good talking about the functions but I’m sure you want to know what happens when you turn on the Sully 4C! I plug in 3 Profiles, one with a cold white module, the second in warm white, and the last of course in color.

We could clearly see that the three sources are homogeneous in white and color for the Sully 4C. We can also see that the output is there and that we have kept the quality of light that has made the French brand famous. Out of habit and also to see the behavior compared to other sources I have used in the past, I used RGB mode. The work done on the colors is truly exceptional. We have an incredible range.
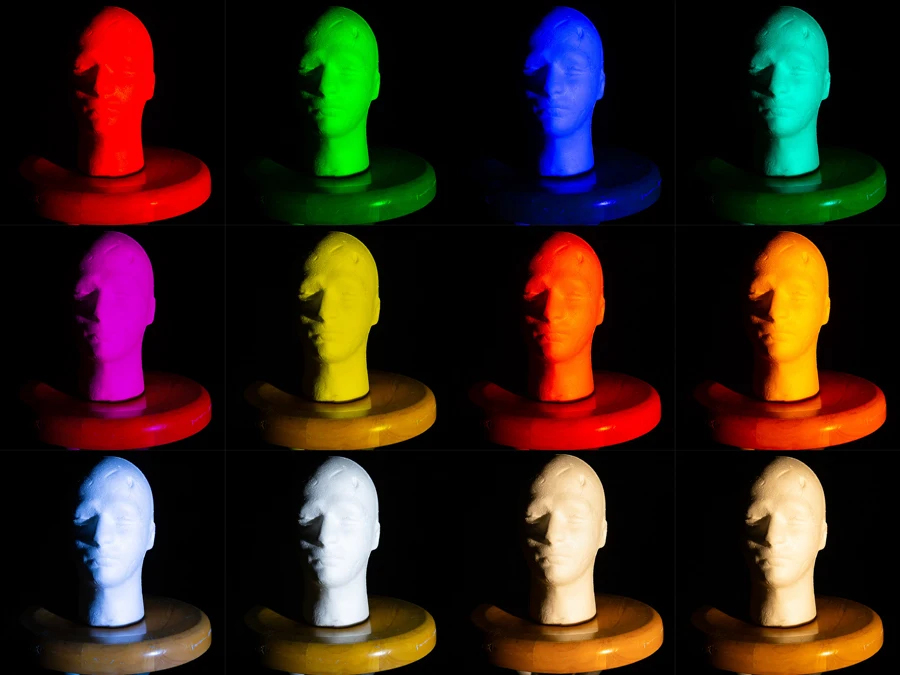

Whether we are working on very saturated shades, pastels, or even a very light coloring of white, the colors are homogeneous and enter the beam very progressively. They are also bright and this is what makes them much superior to halogen sources which lose a lot of output with color gels.
Since we’re talking about it, the range of gels offered is more than sufficient, and being able to work on the transition between two colors makes a real difference compared to a classic color wheel and makes it a color parameter in its own right.
The paperwork!
As it is important to confirm the correct impressions, and it is time to take measurements, we take out our Minolta light meter and thermocolorimeter.
Derating
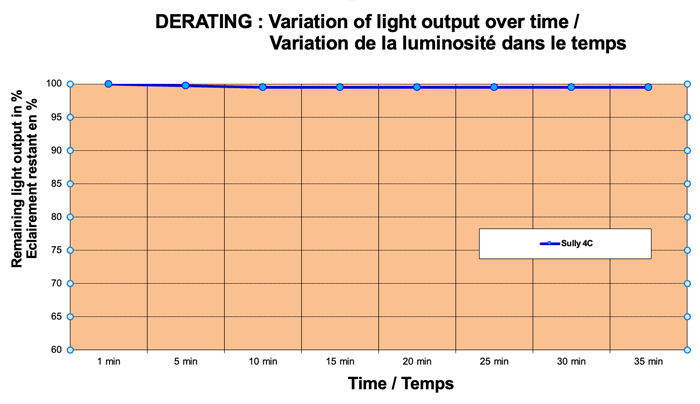
The matrix was allowed to cool down in order to measure the derating. When switched on we note 2,893 lux and for our reference measurement, 60 seconds later we note 2,892 lux. We already have a nice surprise on the cooling management. 4 minutes later we measured 2,885 lux, then 10 minutes later 2,877 lux and we will have no further variation. The derating of 0.52% is excellent!
20° Beam size
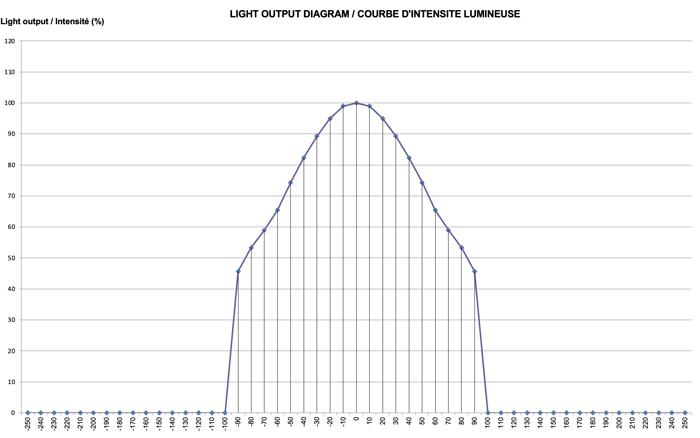
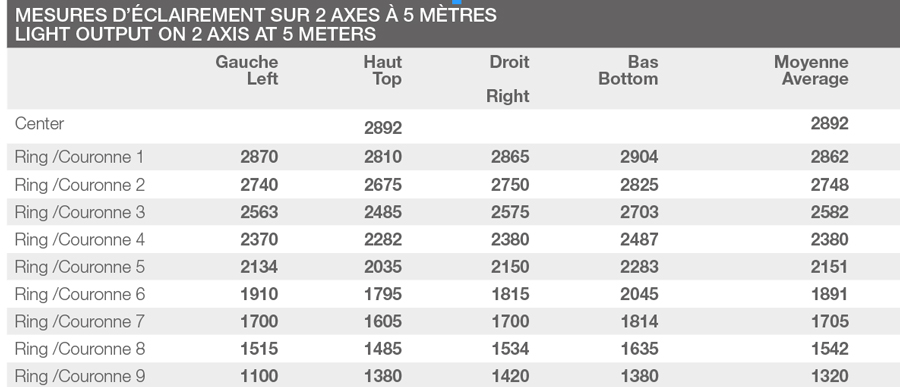
In order to be on familiar ground and have a reference, we used a 614 Profile. We were able to have our reference aperture of 20°. In the center, we measure 2,892 lux. The total output is 5,300 lumens.
Smallest sharp-edged beam
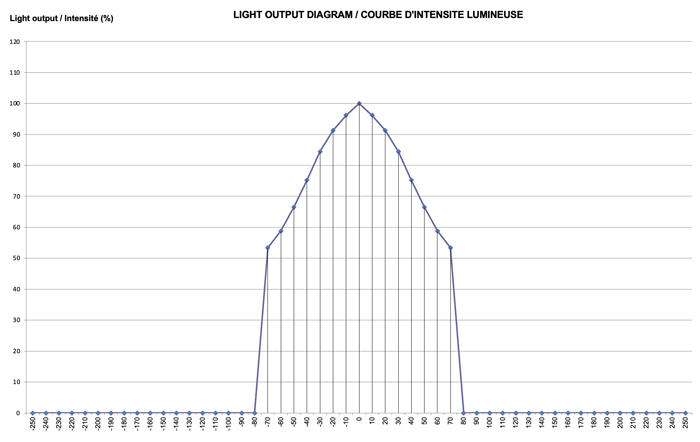
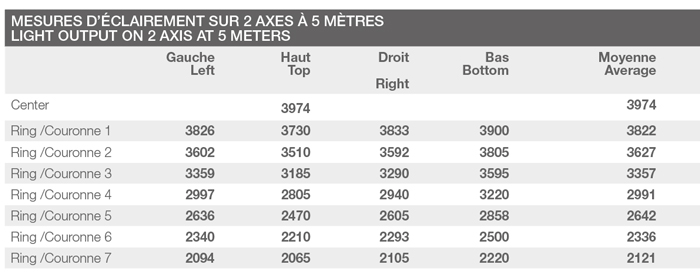
If we tighten the beam completely to the smallest point, the brightness in the center is then 3,974 lux and the total flux is 4,760 lumens for an aperture of 16.8°.
Widest sharp-edged beam
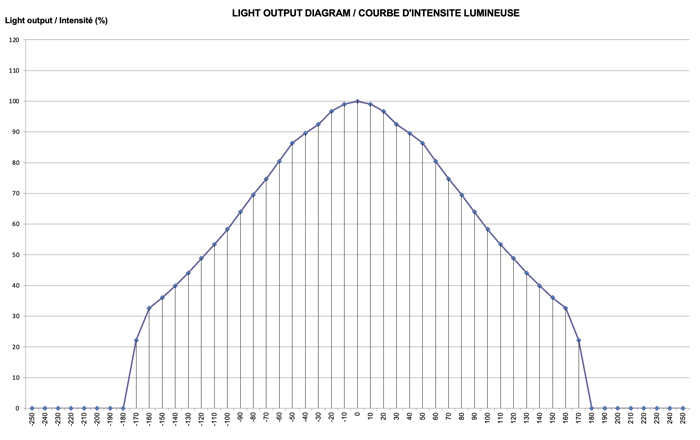
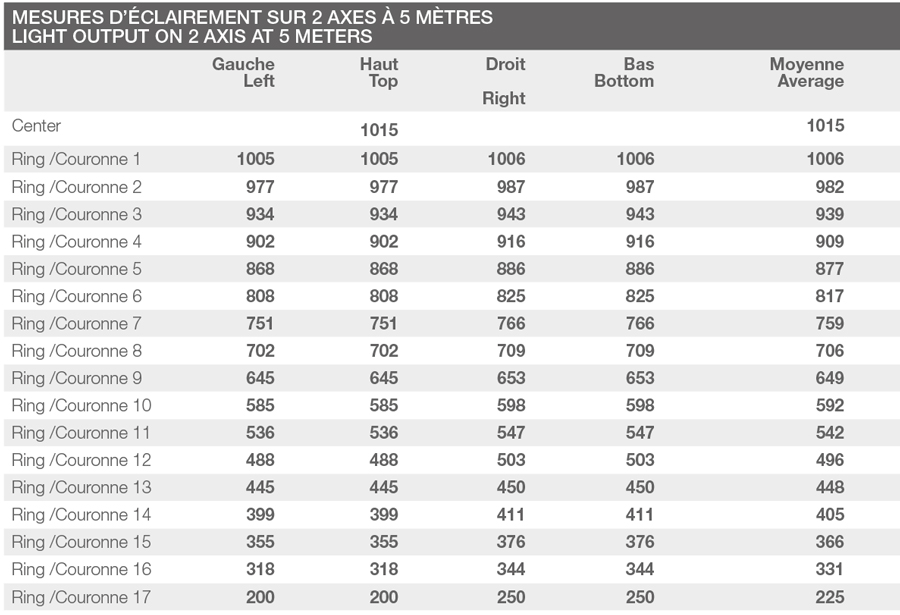
For the widest sharp-edged beam we noted 1,015 lux in the center and a total flow of 5,000 lumens for an aperture of 38°. For the 3 sizes, the intensity curve does not have any “incidents”.
Dimmer
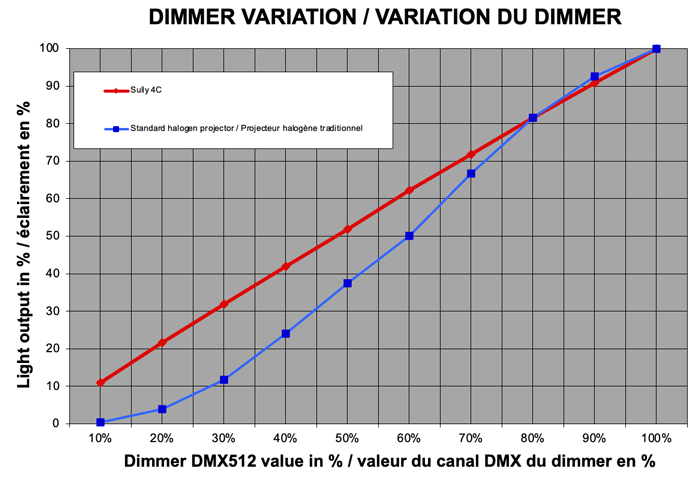
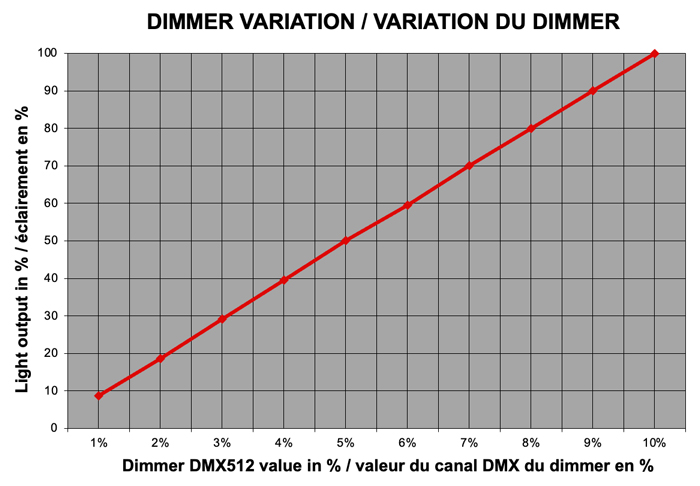
The brightness readings with a linear dimmer curve demonstrate the perfect mastering of the management of LED sources by the Robert Juliat team. Whether from 0 to 10% or 0 to 100%, linearity is perfect.
Another nice surprise is the color measurements. Apart from yellow which greatly outperforms the other shades, and blue which lags behind, the luminosity in red, green, cyan, and magenta is rather homogeneous.
We also did a series of measurements for all calibrated and variable whites, as well as color for the best brightness and quality.
What a pleasure
This test was a real pleasure on different levels. We had an excellent time with Ludwig Lepage who gave us a lot of precise technical information with clear and concise explanations. I also discovered a very good light source with multiple advantages. The Sully 4C module is a retrofit solution that provides a real plus.
It is at least as powerful as the original source by adding a very wide range of homogeneous and luminous colors. As usual, Robert Juliat has made no compromise on quality. The best proof of the success of a fixture is its success and the factory is working at full capacity to honor the large amount of orders.
If you have a pressing desire or simply appreciate beautiful lights, you should urgently request a demonstration from your nearest dealer!
For more information on the Robert Juliat website
 What we liked:
- The color management
- The range of colors
- The retrofit
- The wide variety of possibilities
 What we liked less:
- The absence of an NFC chip


