

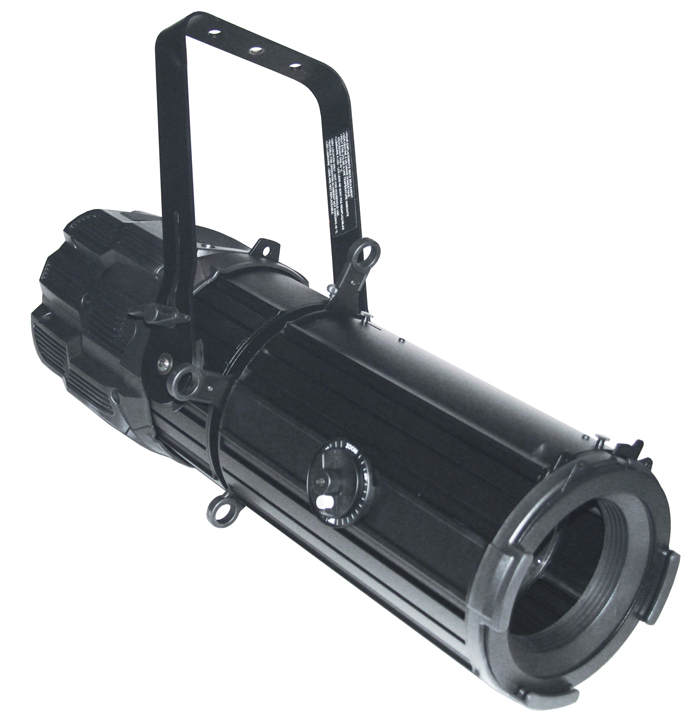
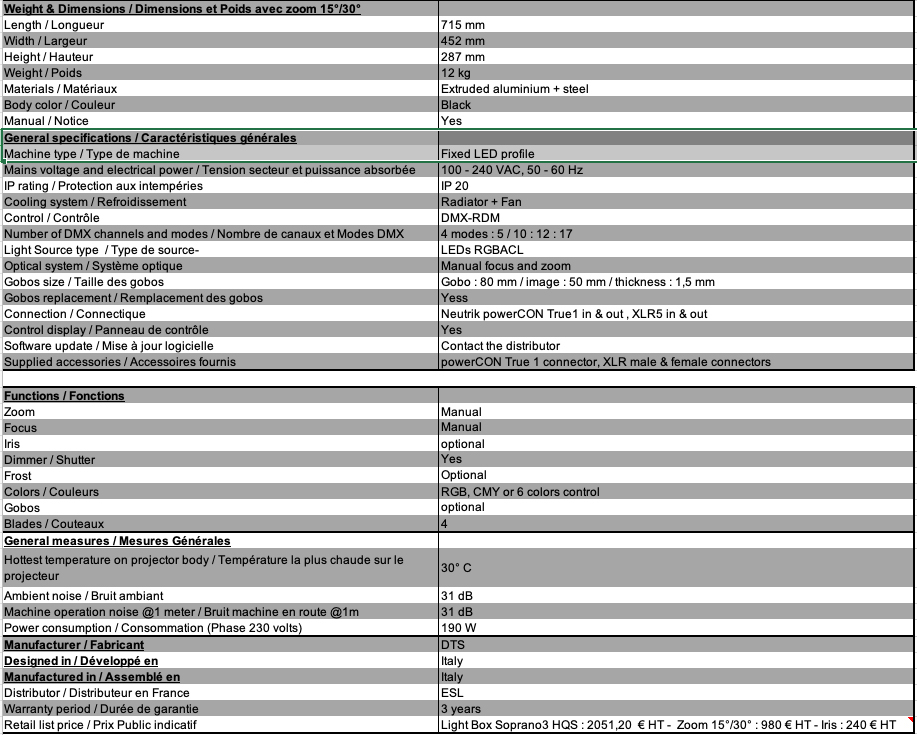
The Italian manufacturer presents its range of LED Profile fixtures Soprano 3 and Soprano 5. These fixtures, available in warm white / variable white / multi-color, have a power of 145 to 190 W for the Soprano 3 range, and 230 W to 390 W for the Soprano 5 range. Each of these profiles can be equipped with a 15°-30° (standard), 8°-20° (long throw) or 25-50° (short throw) zoom lens.
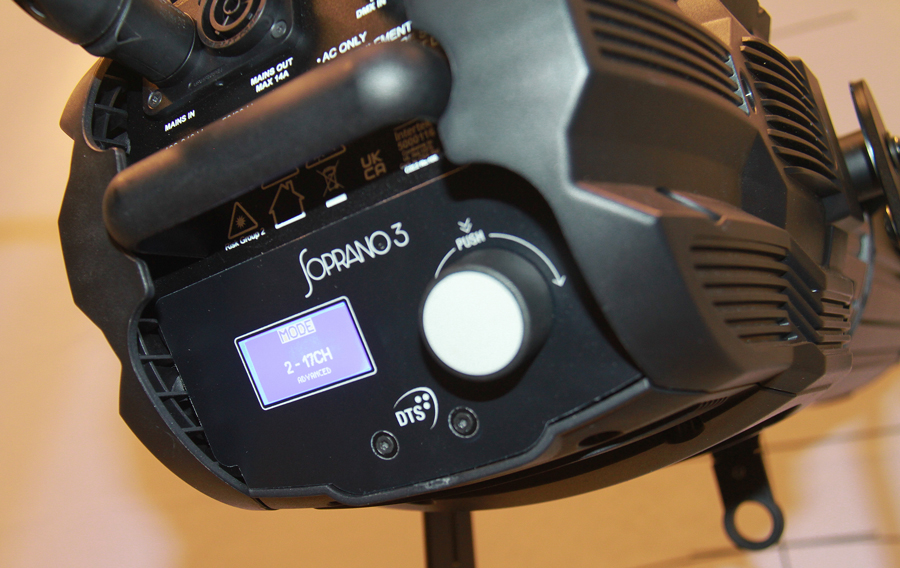
We tested, once again in the “La Boutique du Spectacle” studio, the SOPRANO 3 HQS model, equipped with a 190 W multi-color RGBACL LED engine, with its 15°-30° lens. And it has some very nice surprises in store for us.
The light output of the Soprano
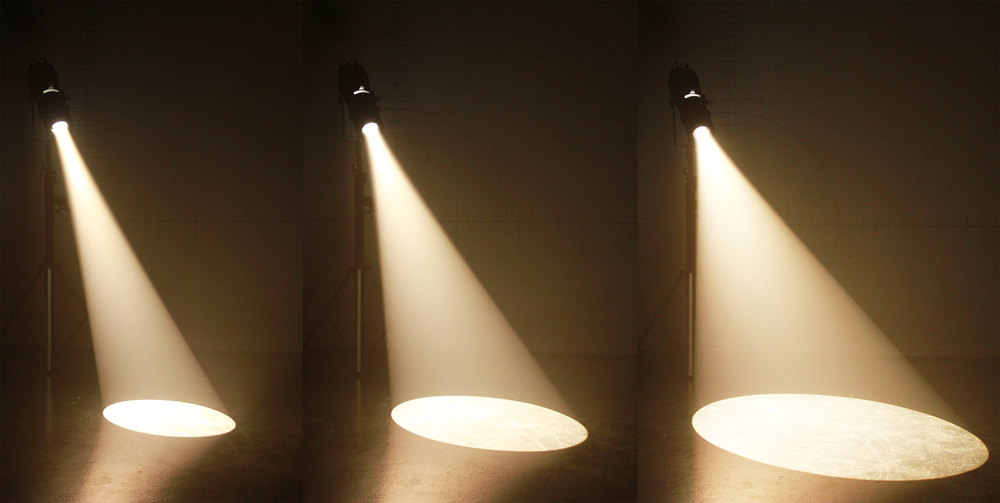
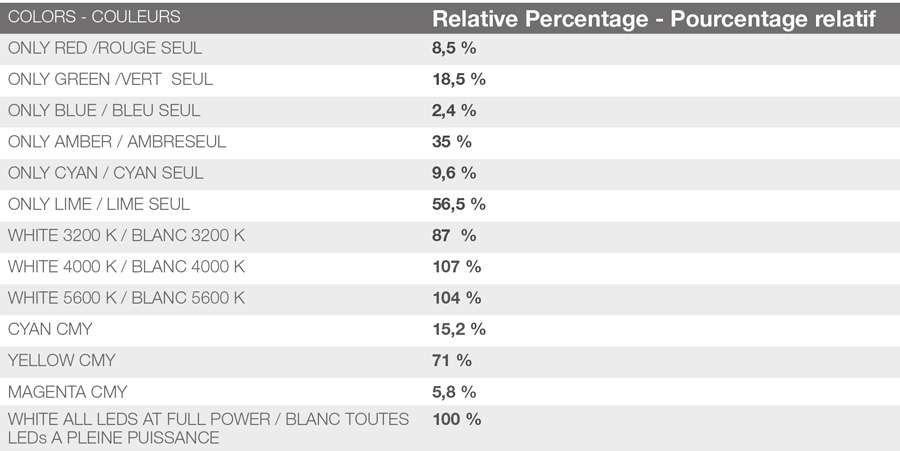
When it comes to light output, our Soprano 3 is very nice. The measurements that we have done easily place it in a category that corresponds to the traditional 1000 W profile with some big differences, however, and mainly advantages!
Even apart from the power consumption/changing lamps/temperature, etc. (we won’t come back on these points, I think everyone is aware of them by now), this has a much more homogeneous light output than that emitted by a lamp with a mirror and double condenser (which was not, so bad at the time when there was almost nothing else).
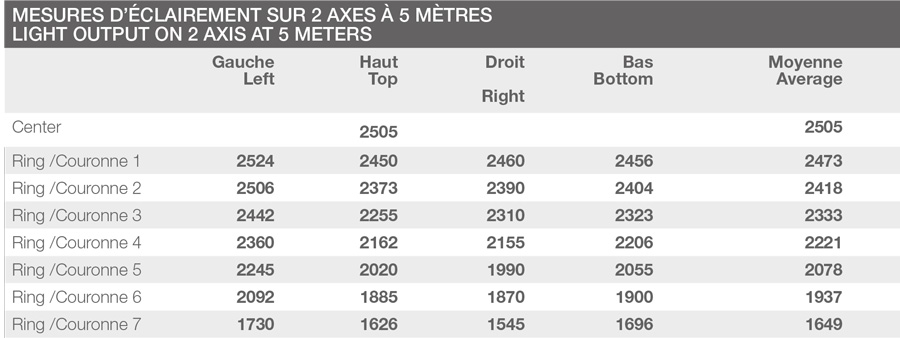
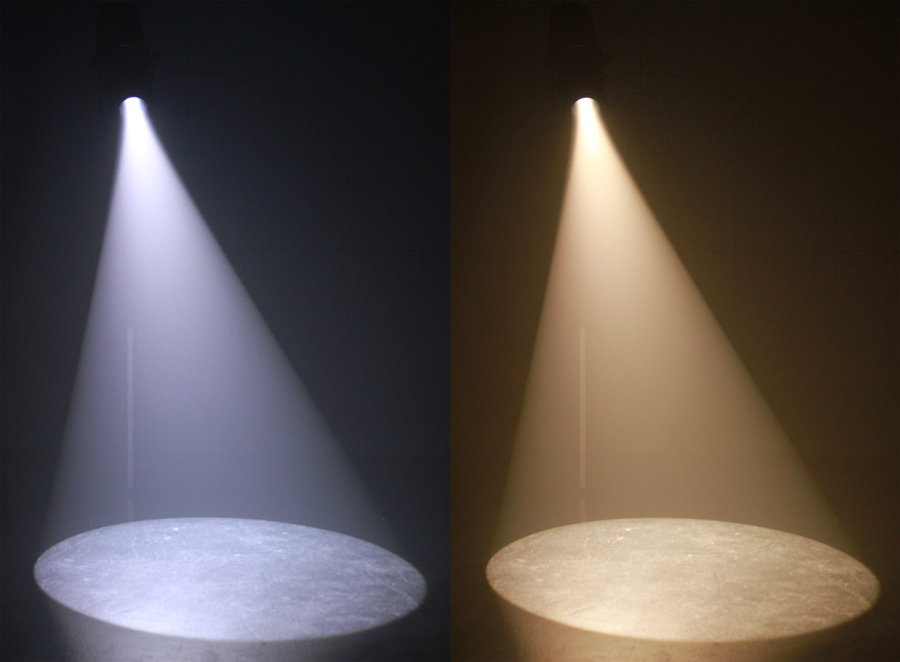
The even spread of light is really clean and you should take a look at the measurement chart to see it. The days of big “hot spots” are long gone… On the other hand, we are in the presence here of a fixture with 6 shades of LEDs, RGBACL which will allow us to consider working with color in a very different way than in the era (now almost gone) of color gels…!
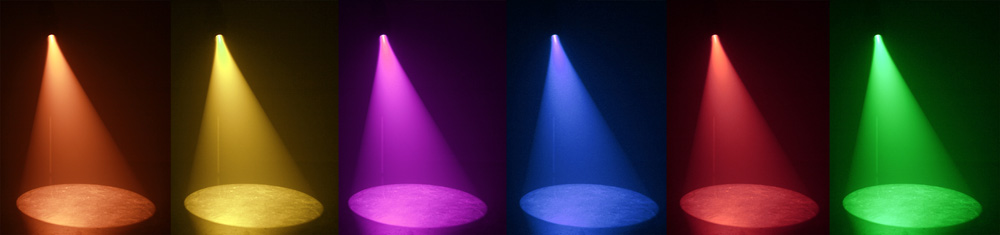
If the output in warm white may seem quite equivalent to that of a 1000 W profile, that of a color tint, say, a dark blue for example (I can see those who have already understood what I’m getting to…), we obtain 3 to 4 times greater output, and particularly given the fact that we can associate the shades with a very high color temperature, that changes almost everything!
The 6 shades of LEDs give unlimited access to most colors with the brightest they will offer. The limits of what we always wanted to imagine with traditional fixtures are taken far beyond. If we add to this that the CRI measured at 3200 K and 4000 K is greater than 95 and 94 for 5600 K, we have serious arguments to affirm that the light output is of high quality.
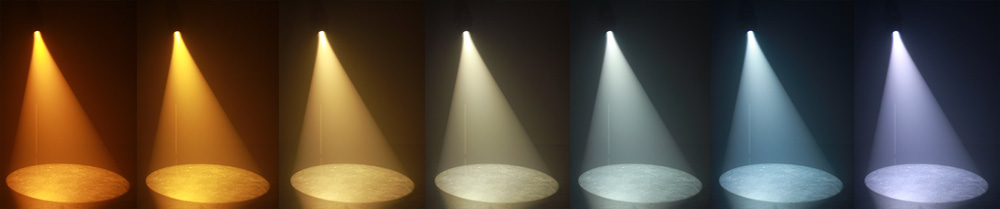
The Soprano has a green/magenta correction in all its modes, which is a fairly advanced version of a “minus green correction”. This is a control of the base color making it possible to correct an excess of green in certain sources, which is sometimes disturbing, particularly in recorded or live broadcasts.
We benefit from a fine and precise adjustment of the green tint since we can reduce its saturation to the point of adding magenta. From 0 to 100% You can match with very greenish lamps until you do without this dominant tint in your recording/live broadcasts. And this parameter is applicable with all your colors, in complete transparency.
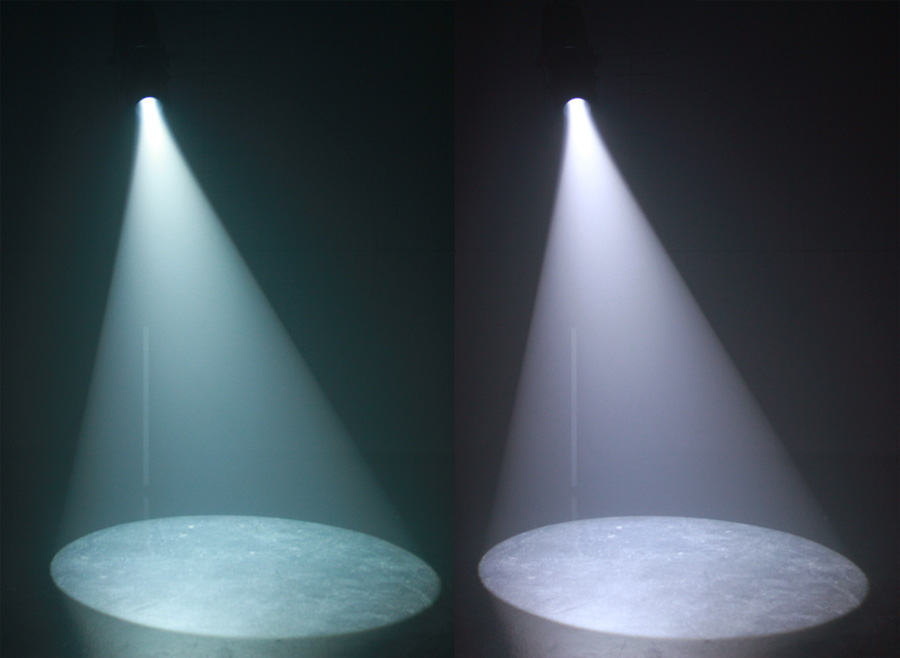
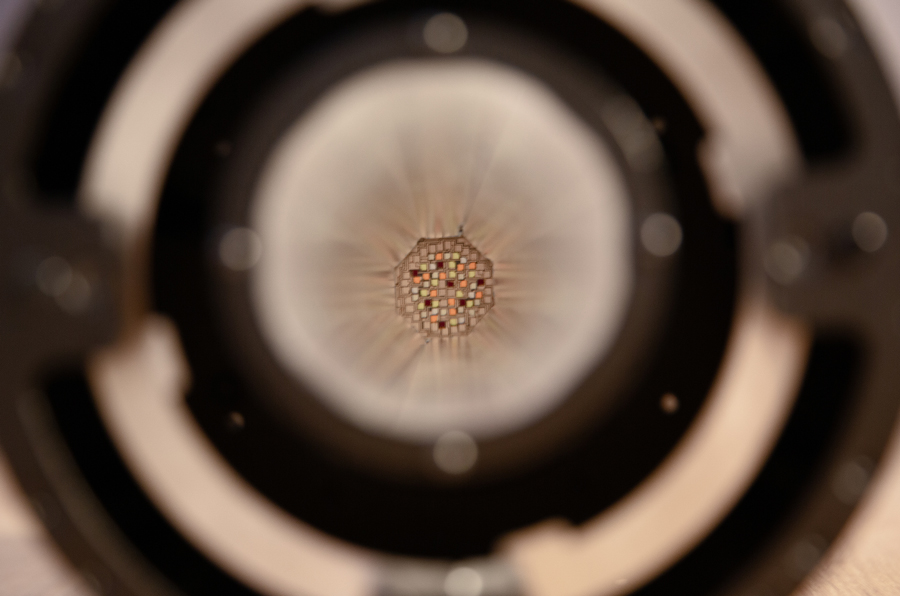
An advantage of DTS compared to many of its competitors is an almost total absence of chromatic decomposition visible in the beam whatever the aperture, and whether in focus or even completely out of focus. The optics are designed not to use the areas where we can start to see the different LED chips outside the nose of the profile. You can pass your hand through the beam less than a meter from the source… Not a single led “leakage” is visible. It’s rare enough to be mentioned.
Handling and operation
First of all, the fixture itself is quite nice. Its construction (100% DTS in Italy) is sleek and very aesthetic. We can see that it’s tough. The whole fixture, lightbox and lens, weighs around 12 kg, which is reasonable.
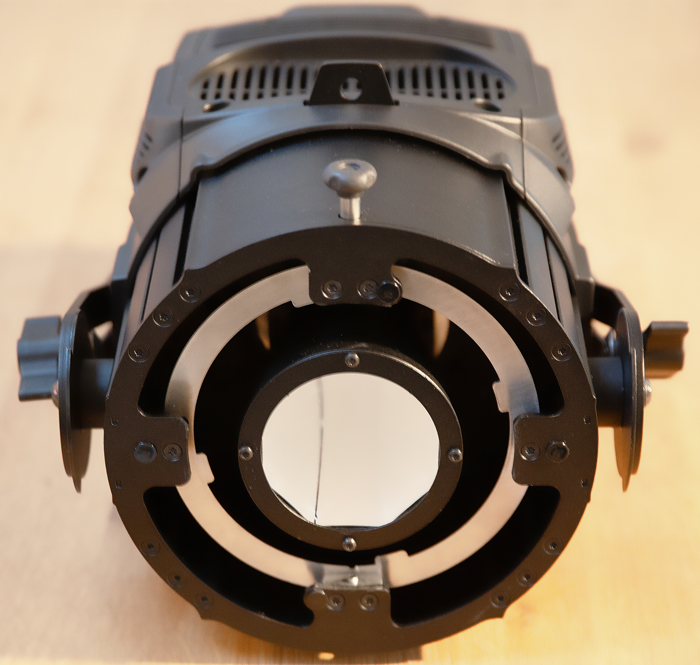
The lens is installed on the nose/front of the lightbox using a set of circular counterplates. Simply engage the lens and turn it a quarter turn, then tighten with the thumbscrew provided for this purpose on the top, and a safety BTR screw below.
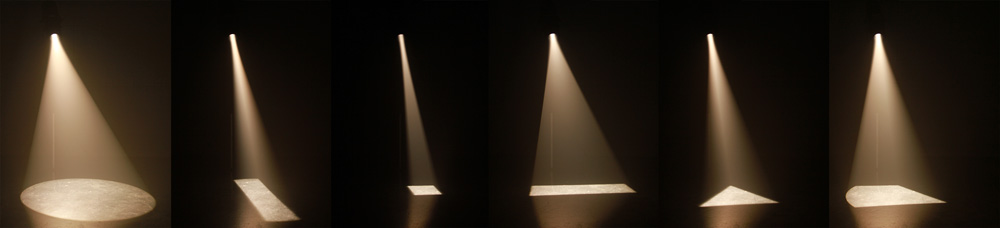
The framing shutters can move very easily and tilt enough to reach positions allowing various triangular shapes to be made. The limit is quite large. Their optical positioning is well done and ensures that we will have a relatively little curve effect, even in fairly extreme adjustment situations.
The blades cannot be removed from the fixture, they are integrated into the optical system. The assembly can rotate 32° in one direction or the other (64° total rotation).
Overall, the handling and ergonomics are very well thought out. This is very important for a static fixture which will have to be handled quite often for adjustments/focusing.
The zoom and focus adjustment are two of the strong points of this fixture. The adjustment wheel/knob for both is located on the nose of the fixture. You have everything at your fingertips without needing to extend your arm to push anything further. The rotation is fluid and precise. It’s a pure joy to use…
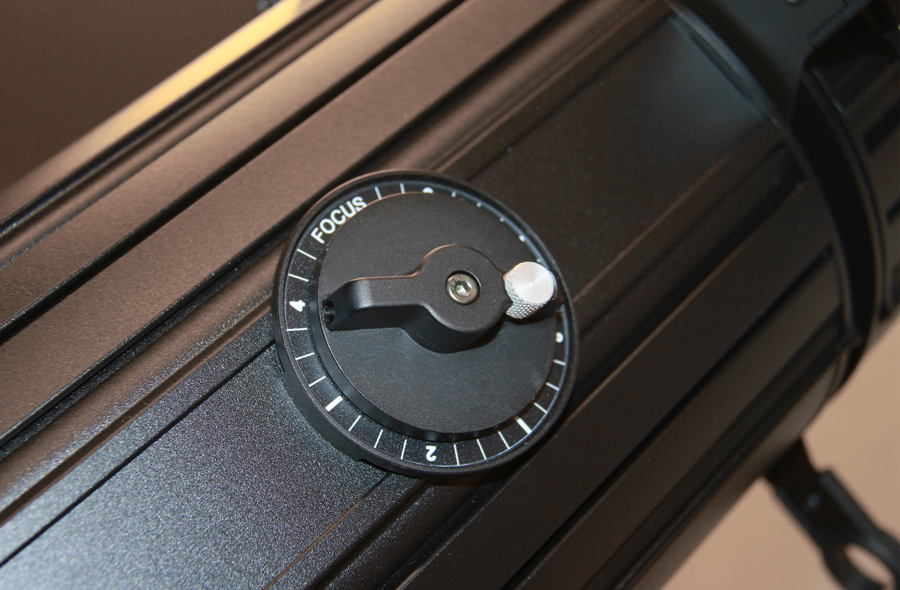
Those who have tried focusing rusty old profiles on theater catwalks will shed a little tear here… I have never had in my hands a fixture of this type that is so easy and precise to adjust.
And the icing on the cake is that each wheel/knob has a small manual screw allowing you to lock the adjustment, protecting it against any accidental manipulation. Perfectly flawless.
A nice filter holder at the tip of the nose allows you to slip in some frost and other additional filters that suit you (or maybe even a simple colored gel if you want to).
The filter holder is round, but as the corners are mechanically free, you can place square filters there too.
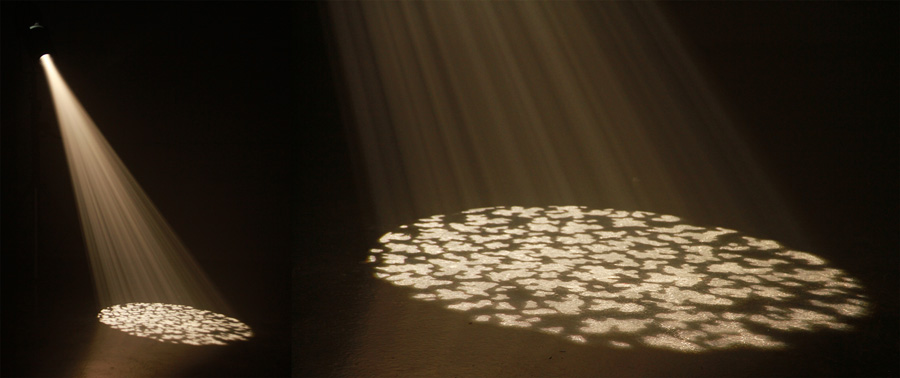
As optional accessories, we can talk about the gobo holder which can accommodate a gobo with a diameter of 80 mm.
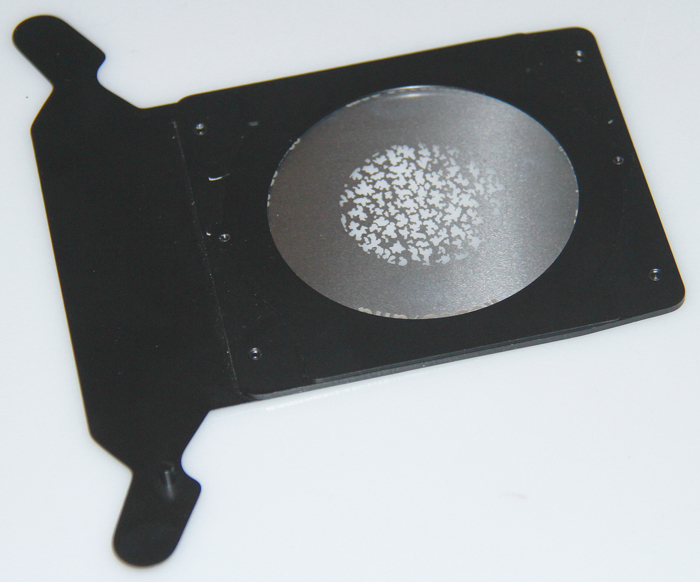
A gobo holder for “M.” size gobos should see the light of day in the coming weeks but the image must not exceed the maximum size of 50 mm, adapted to the optics for projection. If you put in bigger ones, it works, but the edge of the image may be cropped a little.
An iris is also available as an option. Whether it is the gobo holder or the iris, both can be placed near the framing shutters/blades, with a slot provided for this purpose.
Construction and technical examination
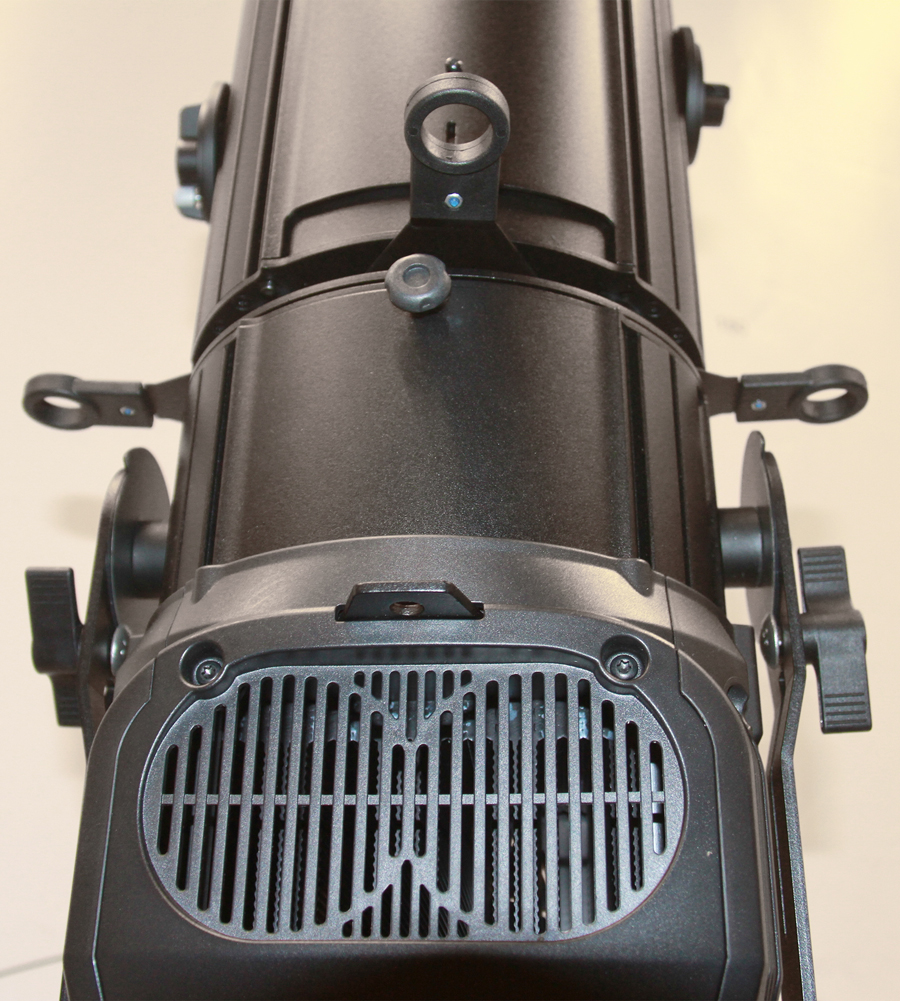
On either side of the fixture, there are large handles, the rear has the menu on its lower part, and the connector panel on its upper part. This is very practical when the fixtures are on a truss or catwalk. It’s often annoying to see piles of cables dangling under fixtures.
Concerning the connectors, a True1 input for the power supply, coupled with an output to “daisy-chain” to other fixtures (the Soprano 3 consumes less than 200 watts at full power, you can imagine that we can power a certain number of them on a mains line…), and a 5-pin XLR input/output for DMX/RDM.

The body of the fixture is made up of fairly light but very robust alloy casings, with a granulated finish that is particularly pleasant to the touch.
The LED engine is located just before the output optics, with much of the space behind being taken up by the cooling system.
A set of radiators topped with forced ventilation ensures the proper functioning of the LEDs through precise control of their temperature.
The entire rear is occupied by the fixture management electronics as well as the power supply, the electronics corresponding to the connector panel, and the user menu being located at the rear of the fixture.
A ring for attaching a safety sling is placed on the top of the fixture.
On the nose side, the internal mechanical elements are quite simple, all the ingenuity being in the ultra-efficient creation of the rods/rack for adjusting the positioning of the lenses by these famous and fantastic wheels/knobs.
The positioning of the fixture in tilt and its rigging by its solid and long (very long) yoke are ensured by a manual wheel which ensures very good tightening. The tilt orientation, however, has some mechanical limits which do not allow it to exceed 270°.
It’s not a major problem but in the case of installation on the apex of a truss or a stand, we would have liked to be able to tilt a little more downwards, especially with such a large yoke which would easily allow for it. This remains a very minor flaw.
Video presentation by Jean-Marc Jolivet – Technical-Sales Manager at ESL
Photometric measurements
Derating
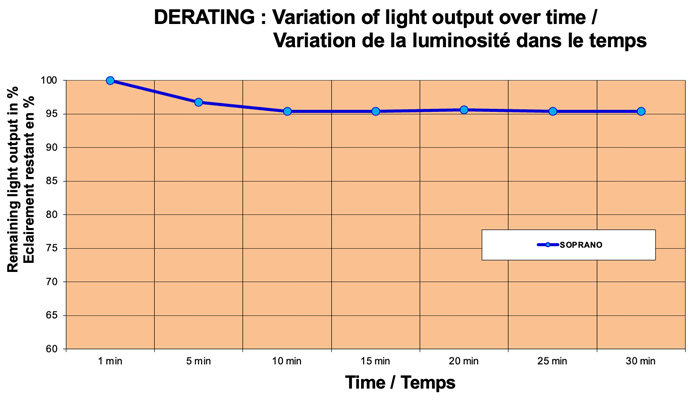
The derating, attenuation of the light output during warming up to full power, is less than 5%, which demonstrates good management of the temperature of the LED engine and the light stabilizes in less than 10 minutes.
We choose to carry out the measurements at the color temperature of 4000 K and the zoom 15/30°.
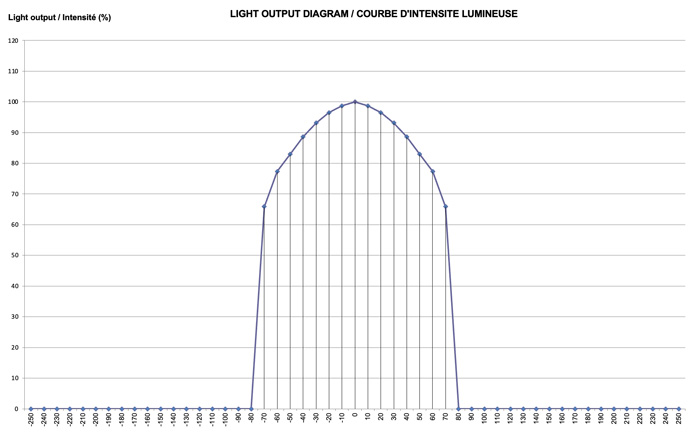
Smallest sharp-edged beam
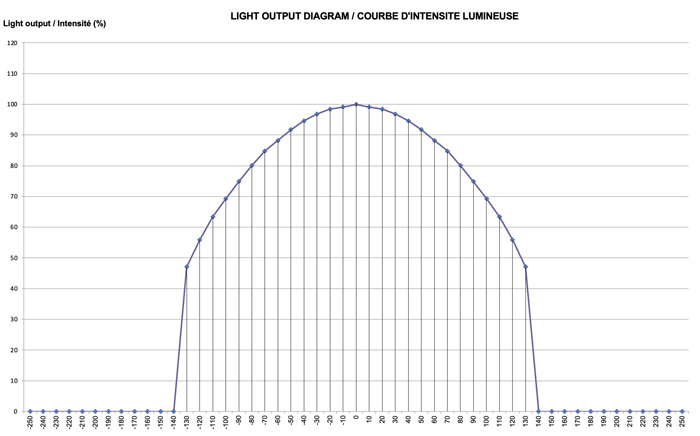
The illuminance at the center of our target 5 meters from the fixture is 2,500 lux after derating (2,600 lux at cold start) and all of our measurements have a flux of 3,585 lumens (3,700 lm at cold start). We measure an angle of 16°. The light intensity curve is regular.

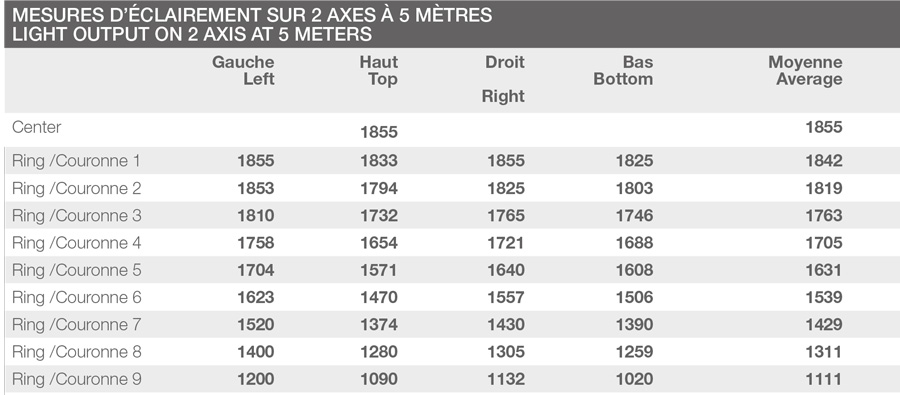
A beam of 20°
1,855 lux in the center after derating, (1,945 lux at cold start) still at 5 meters, the flow this time increases to 4,130 lm after derating (4,330 lm at cold start).

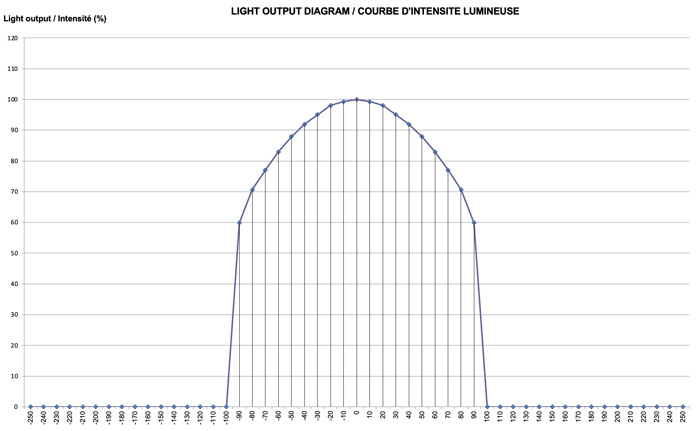
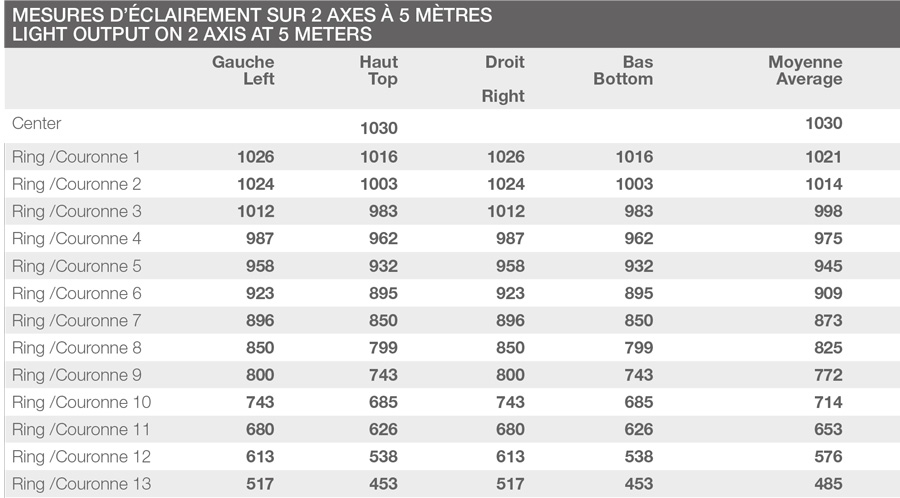
Largest sharp-edged beam
The largest sharp-edged beam corresponds precisely to an angle of 30°, the flow is optimized. 4200 lm hot (4450 lm at cold start). At 5 m you will benefit from an illuminance of 1030 lux hot (1080 lux at cold start) and a light intensity curve that is as linear as ever.

Menu access and management of settings
The menu is accessed using a large and thick wheel which allows you to move through the different pages and validate by pressing on it.
The first function accessible in the menu is the “Highlight”. This function gives immediate access to the fixtures’ light output. A simple press on the wheel, and you just have to rotate it to manage the intensity from 0 to 100%, which is extremely practical…
You can focus your profile without needing a console operator or any remote control to activate the circuit. Excellent idea.
In the menu, you also have access to strobes, green management, color temperature, or even each color source. For use without a console with the desired setting (for filming, permanent/house lighting, etc.). It’s very useful.
There are 5 control modes, from 5 to 17 channels, that allow you to control the Soprano. We did our tests in “Basic” mode which is the most “standard” giving access to the shutter/dimmer / emulated color temperature variation from 1800 K to 10,000 K / green saturation and access to the 6 native colors individually.
This mode also gives access to the emulation of shades from the more than exhaustive LEE and ROSCO gel libraries. In addition to the color temperature channel, you access the colors of most classic gels, with any type of source. And the result is really convincing.
Another mode called “CMY emulation” allows you to use colors as if they were subtractive trichromacy, which will prove very useful when cloning on a show with data from CMY fixtures, or for those of you who are used to working in this way. The other modes manage color exclusively according to Lee and Rosco gel library emulation.
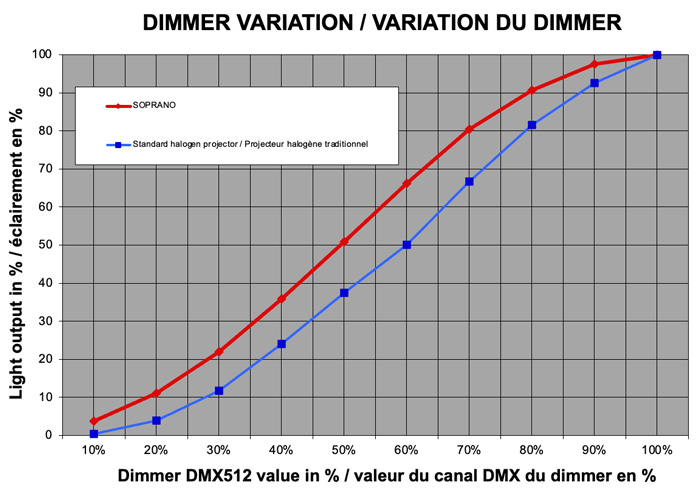
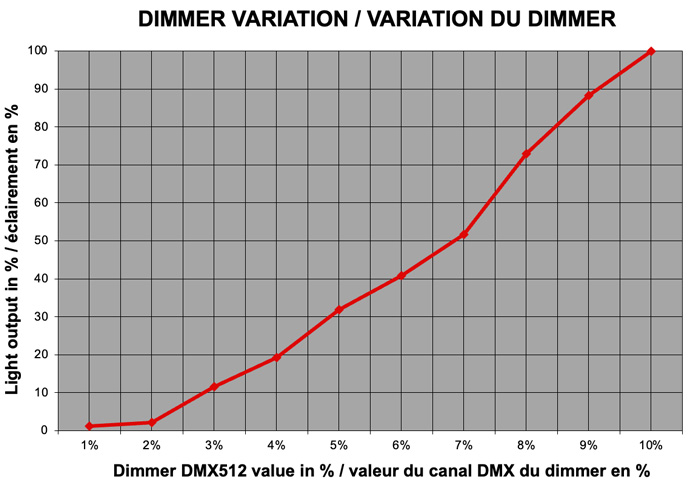
Four dimmer curves are available. The first is called “Quadratic”, the next is Gamma 2.2, the third is a classic S-curve and the last is linear. We are using the S-curve, the most classic there is, and its curve is very close to what we obtain with a classic dimmer
In the menu, the dimmer curves are called “Gamma Corr.”. You need to know this because if you look for a “dimmer curve” you will be looking for a long time! You can activate a tungsten emulation which will give a simulation of filament inertia to the behavior of the dimmer. It’s quite realistic.
Noise management was a key concern when designing the Soprano. Like any good fixture intended for the theater world (among others), this fixture, which nevertheless uses forced ventilation, allows you to configure different cooling modes to adapt more or less to the need for the silence that may be required.
No less than 4 ventilation modes are available. A “standard” mode will manage average ventilation that is not too noisy, and an “auto” mode will adapt the ventilation according to the temperature of the components (and will therefore go towards noisier ventilation automatically if you put everything to full for a long time), and two quieter modes “silent” and “ultra silent” which will silence the projector strongly and almost completely at the cost of losing a little flux to preserve the integrity of the LEDs.
Most of the optional configurable functions of the Soprano 3 can be configured remotely via the DMX-RDM “control” channel, starting with the multitude of dimmer behaviors (in addition to curves and tungsten emulation), up to the ventilation mode or menu backlight turning off.
Conclusion
Here we have a sleek, nice-looking profile that constitutes an excellent achievement in the field of static LED fixtures. In this “full colors” version it is a powerful and complete tool allowing a simple profile to become a leading fixture to far exceed anything that has been conceptualized for ages in the genes of profile fixtures.
DTS presents here a remarkable product, 100% “made in Europe” which users should love. I was impressed by this fixture.
More information at the DTS website
 What we like:
- The quality of the light output
- Adjustment ergonomics
 What we like less:
- The size/height of the yoke
General Specifications


