

At Robert Juliat, when changing technologies, they don’t do things by half measures. After having customized their 614SX range with a 150 W LED source (the profile and Fresnel ZEP), our French manufacturer presents an ultra-modular concept based on smaller LED sources, allowing the production of fixtures that are much more compact, lightweight and convenient, available in profile or Fresnel types with fixed or variable color temperature and a selection of finishes – you name it. Getting to the point, here is our test of the Tibo 533 LED profile, in three versions of white light.
one Tibo, two Tibo, lots of Tibo
Everyone knows and appreciates the Robert Juliat flagship products. The theatre world owes them eternal gratitude. Their profile fixtures have become not only a point of reference, but a common noun, and we can finally do our bidding abroad with homegrown products. Nevertheless, in the face of the onslaught of LED products, I feel compelled to make a brief summary. Our more impatient readers can, if they wish, skip directly to the subsequent paragraph, in which I will accommodate them shortly.
So, for the others: While some manufacturers immediately altered course to a fashionable new green, ecological and futuristic technology, the French in particular waited for this technology to develop enough to satisfy their demanding customers and users. Especially in a conservative environment, budgets don’t allow for the annual renewal of lighting inventories.
So, for the others: While some manufacturers immediately altered course to a fashionable new green, ecological and futuristic technology, the French in particular waited for this technology to develop enough to satisfy their demanding customers and users. Especially in a conservative environment, budgets don’t allow for the annual renewal of lighting inventories.
Robert Juliat then decided to improve their design and to divide this new range into two separate series. Remaining faithful to the design of the blessed 614, completely homogeneous with immense rigs of halogen-source profiles, the French company developed its own 150 W LED source, a power supply and a specific menu that led to the Zep profiles in early 2012, the 640SX range in Juliat terminology. With smaller dimensions than Aledin, this fixture also retains all the advantages of handling and installation of the 1000 W halogen ranges, is available in three different zoom ranges, two versions of white – warm (3200 K) or cool (6000 K) – and is able to compete with 2000 W profile fixtures.
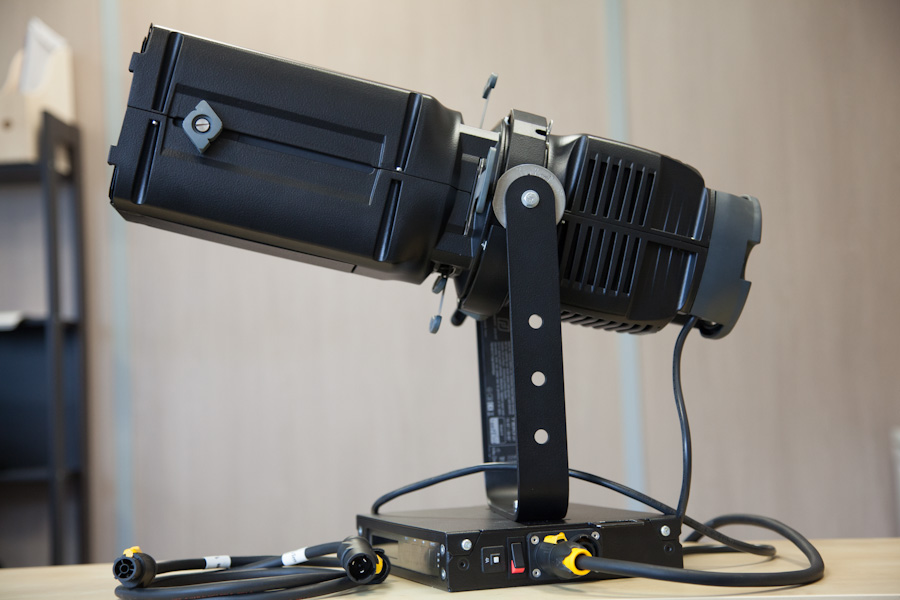
At the same time, the Tibo concept was born. More modest in terms of power, but with size and weight significantly reduced, a 2-in-1 zoom, a wide range of light sources (halogen, LED and discharge) and finishes available, this new, aggressively-priced series aims to be the missing link and the champion of a new “Creative Concept Light” philosophy.
Tibo LED, handling and ergonomics
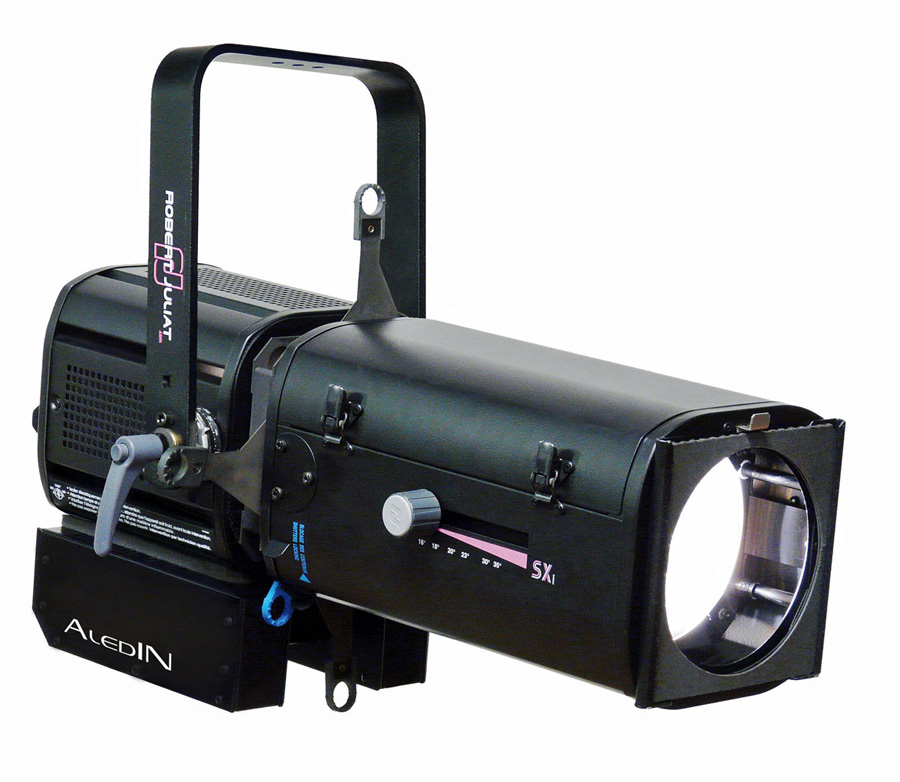
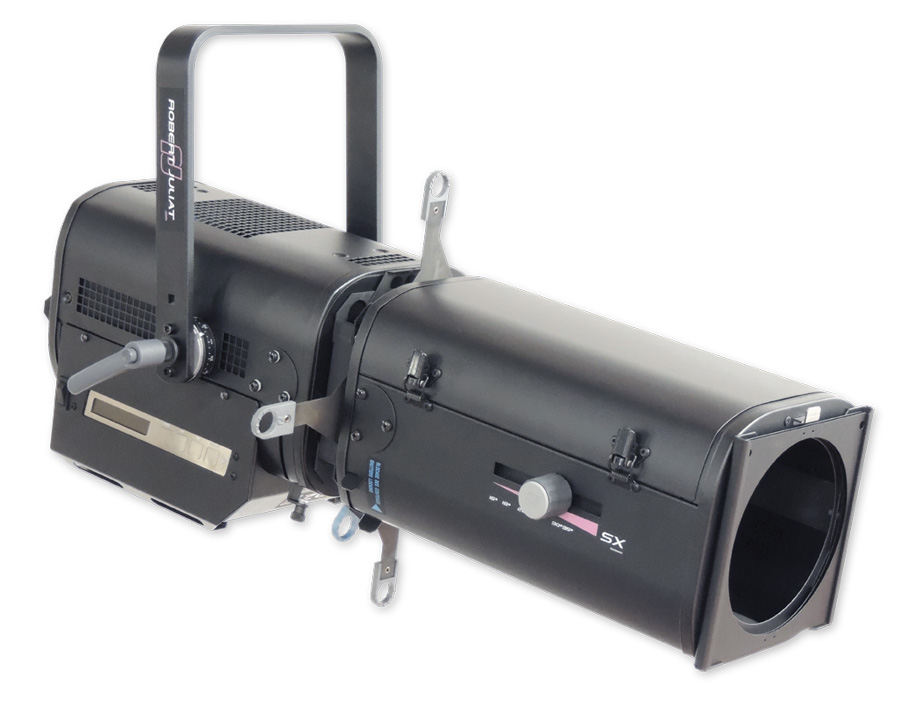
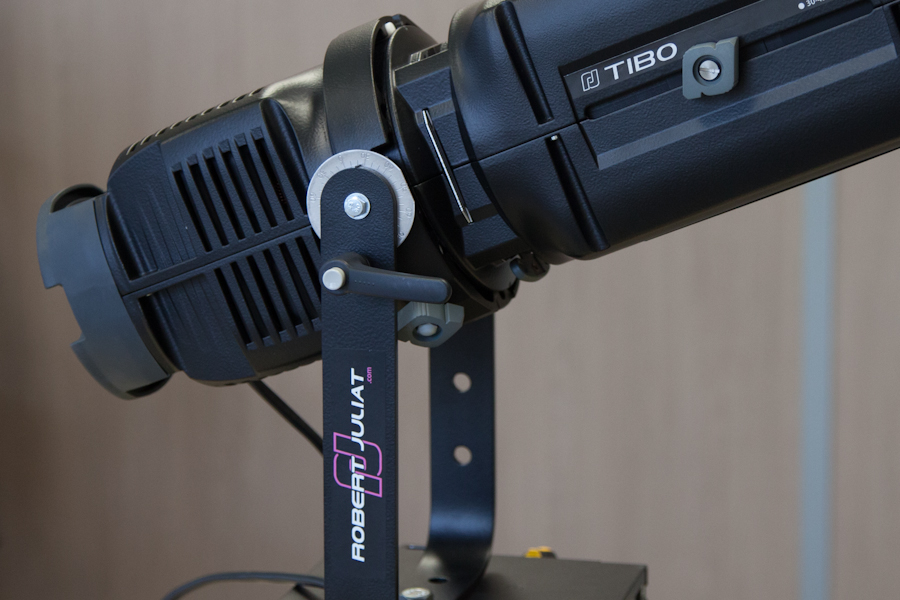
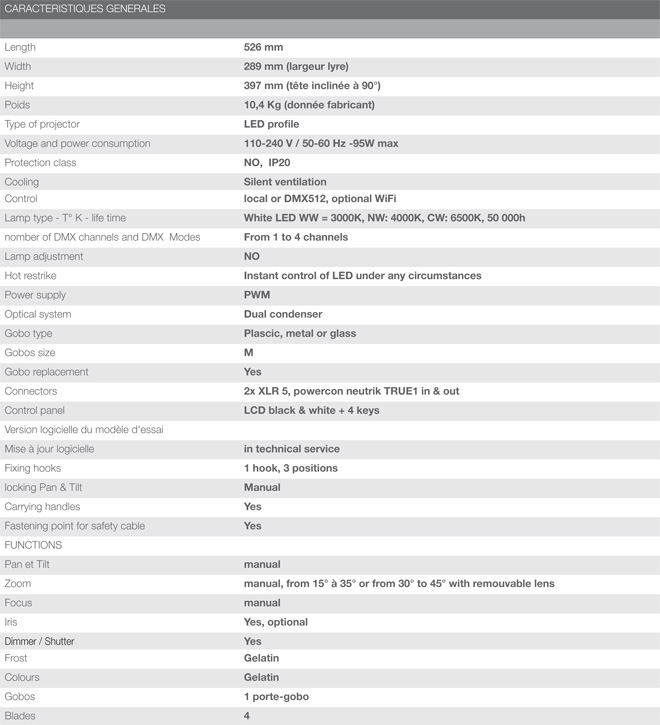
Even though Tibo comes in several versions depending on the technology employed, its cast aluminum chassis remains the same. Its small size and weight allow it to sneak in anywhere. 53 cm long, 29 cm wide, 40 cm high and weighing 10 kg, it will change the habits of 614 users. We got to test the Tibo 533 in 3 LED versions: cool white, neutral white and warm white.
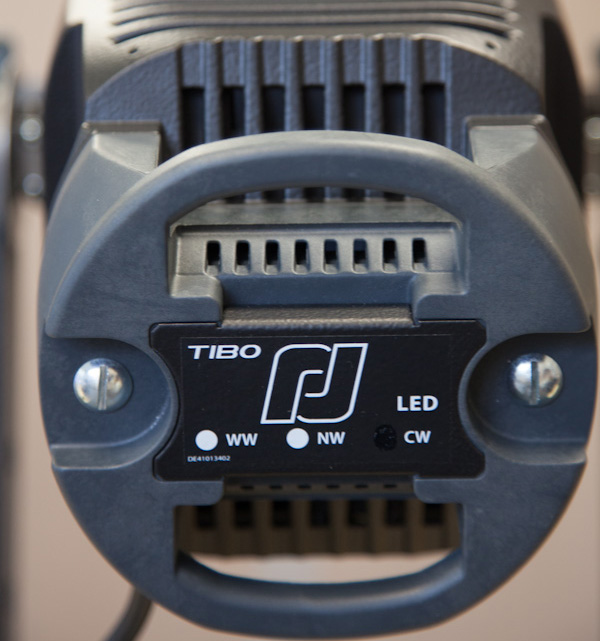
The construction is standard, with the rear block dedicated to the source and provided with a double handle that is quite comfortable. No need to worry about your knuckles, the heat radiated by the LED unit is barely warm.
Two screws for changing the source are located on each side of the identification plate. A small black cable connects it to the external power unit.
Two rings for safety cables are situated on the sides, just behind the cooling fins that surround the optical unit.
The central section hosts the attachment for the yoke, with Juliat’s famous detachable handle, in a slightly revised design. The yoke has six holes for the brackets and/or for securing the power supply, three above and three on the side. The yoke is connected to the center of the profile and includes an indexed counter-plate for identifying the azimuth of the fixture during adjustments.
Next comes a new handle, which elegantly forms the merged letters R and J, for locking and rotating the projector head through 360°. The majority of the surfaces are lined with polytetrafluoroethylene (Teflon), an ideal material for its durability and almost total absence of friction.
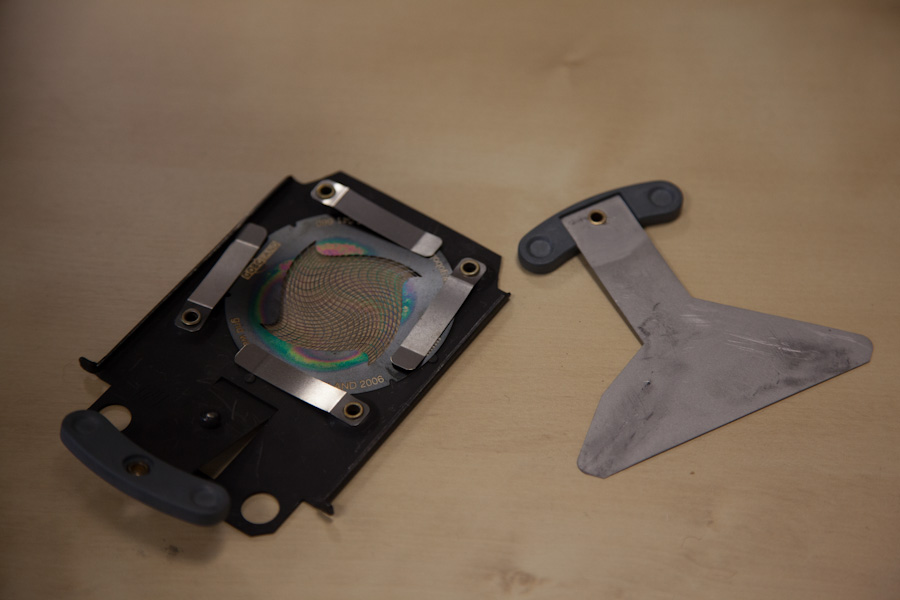
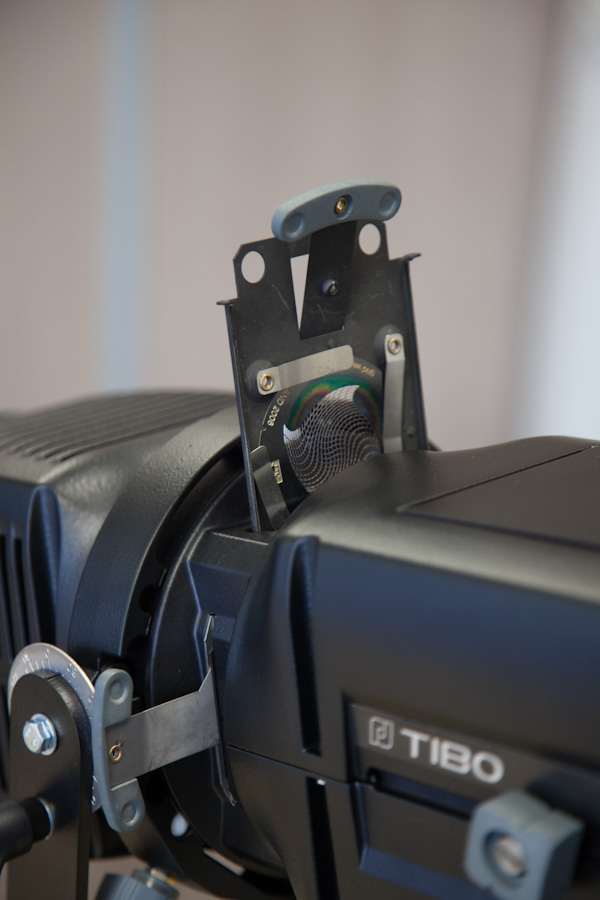
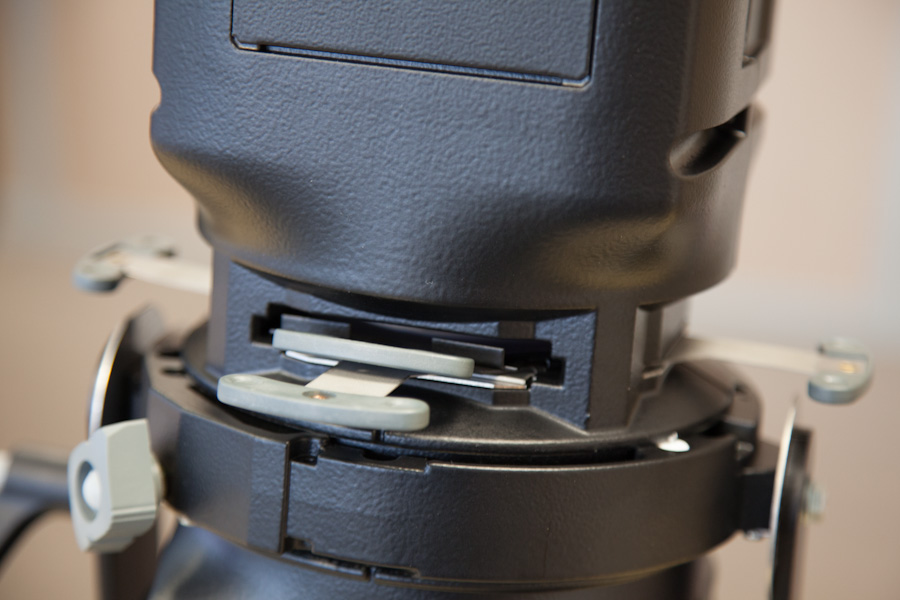
The “accessory” module includes the shutter group and a slot for a gobo holder or iris. The shutter blades – necessarily smaller than any we’ve seen before – allow various settings without difficulty. I find them even easier to insert than those of the 600 and 700SX. A touch on the locking clutch, which is somewhat hidden on the unit, and nothing moves. But do not lose these shutter blades. Their small size, and the absence of holes to slip in a sling to tie them together, kind of force you to leave them in the fixture. But they protrude very little once they are closed, so you do not have to worry about damage during transportation.
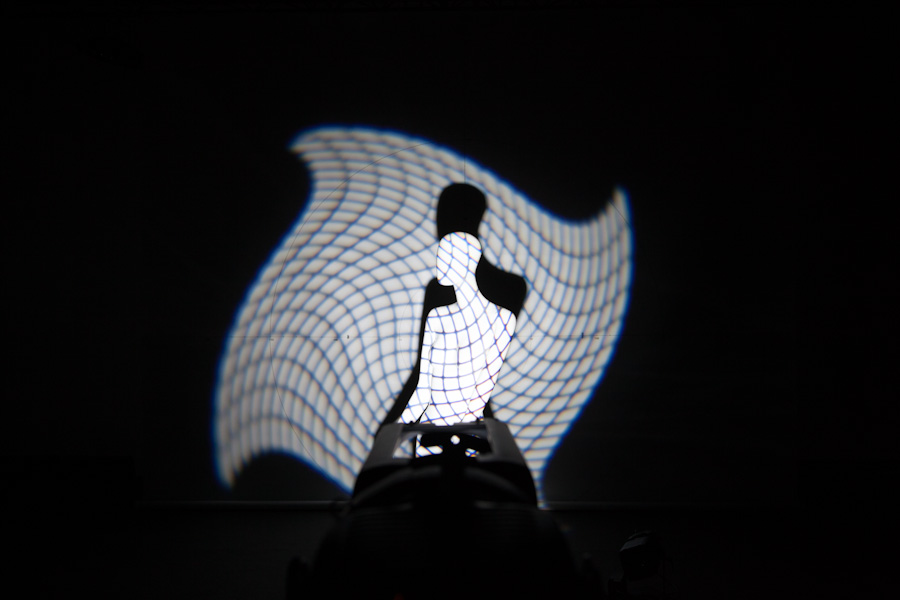
The gobo holder is very simple. It is inserted via a double slide and is kept in place by a locking tab (which has the same shape as the handles of the shutters). Held in place by four fixing tabs, the size “M” gobos (effective diameter: 48 mm) can be made of metal or glass, but nothing prevents you from using printed plastic sheets when you take the LED option (finally, you can recycle your overhead projector transparencies!).The iris can replace the gobo holder, if the necessity presents itself, but you can not insert the two together.
The projection head completes the unit. New “RJ” knobs located on each side allow the adjustment of zoom and focus. Nothing remarkable, but a rather interesting 2-in-1 zoom: with its set of two lenses, the basic zoom range is 30° to 45°. Opening the top cover, you can remove the first lens with a simple clip, and the zoom range becomes 15° to 35°. This unique mechanism provides a cost-saving solution that will prove relevant to many users. It will be necessary, however, to have a place to store these valuable lenses once they have been removed. Finally, a forward slot allows the insertion of gel holders of all kinds. The new gel frame holders are also now equipped with two small holes, perfectly sized to accept standard staples. A quick click of the stapler and your gel will stay put in all circumstances.
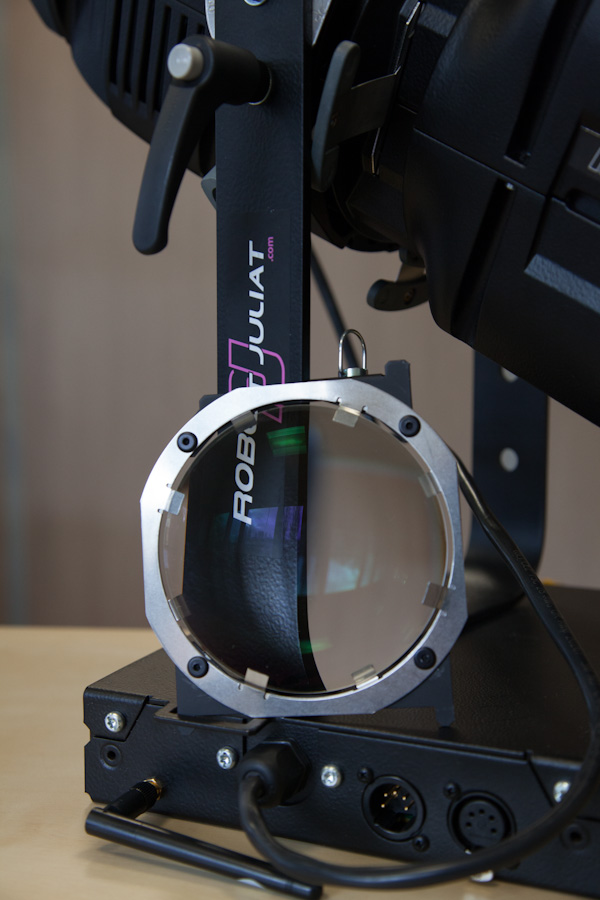

A PWM switching power supply unit is matched to each LED version. It is connected to the source via a special 1 m cable (removable only by a qualified service center) and can be fixed directly to the projector yoke, or be flown nearby using its own hook. Compact (29 cm x 20 cm x 6 cm) and weighing 2 kg, it is completely silent and features 5-pin DMX input/output connections on one side and, on the other, mains power input and throughput using the new Neutrik powerCON True One connectors. These connectors are electrically secure and notably, in contrast to standard powerCON connectors, allow the direct connection of a male connector to a female connector, if necessary, for extension.
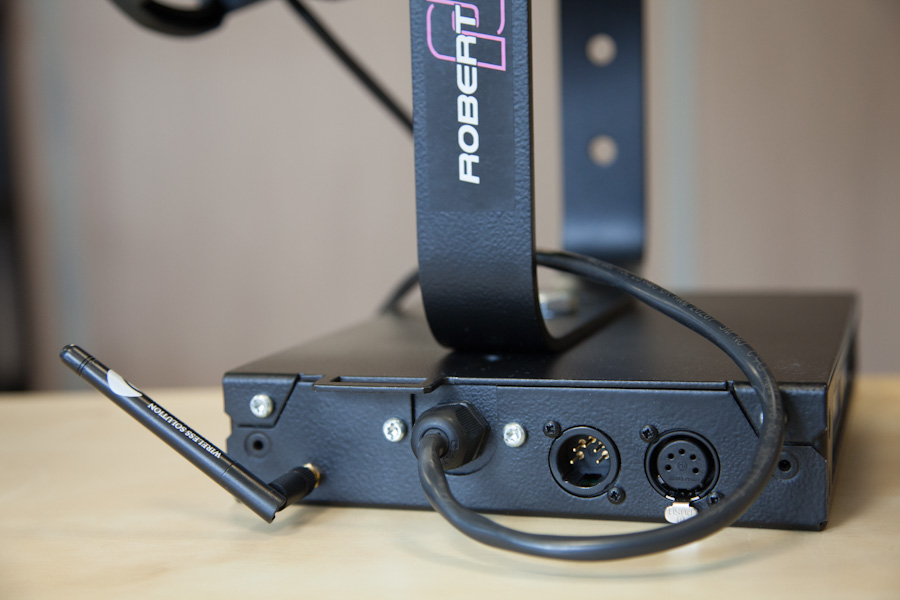
It has always been difficult to get used to saving power, but remember that you can daisy chain up to 35 Tibo 533 units on the same 16 A circuit, more than you can on a DMX line, which is limited to its standard 32 units. I don’t know about you but, for me, this is breathtaking.
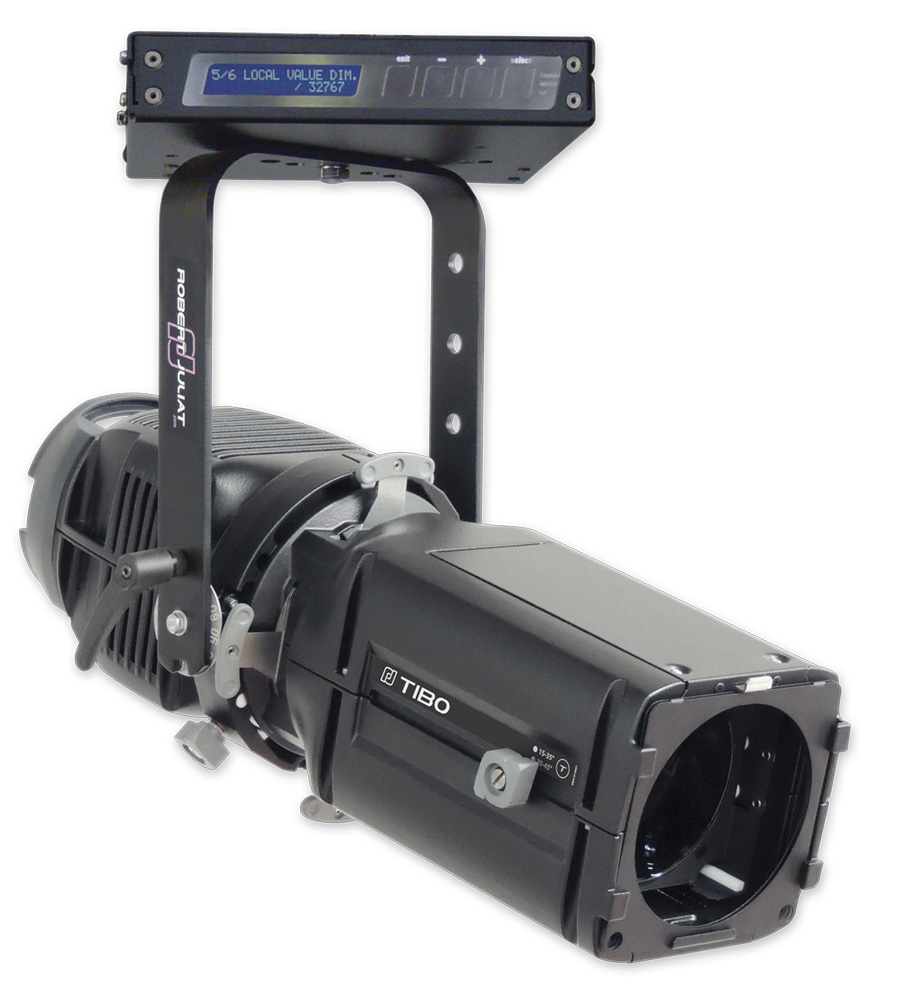
A switch and a resettable circuit breaker (which will save us from endlessly looking for fuses in case of problems, only to wind up using aluminum foil) complete the unit. An optional WiFi receiver can provide a wireless DMX solution. Finally, on the front is the control menu, which traditional users should pay attention to, and which I will describe in detail.
Menu and settings
Upon powering up the unit, the LCD display will hold on its initial menu, “DMX config”. At that point, it is important to know a shortcut: pressing and holding the “Exit” button will light the fixture for set up for 1 minute or until the next pressing of this button. This function is the “Focus” mode, which will allow the electricians to adjust their fixtures without the intervention of a console operator.
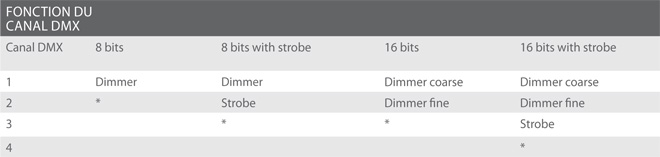
The DMX address is the first information you should provide to the luminaire. Depending on the mode, the DMX references of the other channels will be specified here. First of all, you must select 8-bit or 16-bit quantization – for a precision of either 255 or 65,535 steps, respectively – which require two DMX channels from the console, and then you choose whether or not to add the strobe mode, which requires an additional channel.
Finally, the “Master” mode also adds one more DMX channel. This particular mode allows both the console operator and also a technician at the rig (with an optional potentiometer) to control the intensity of the beam. This channel serves to set a maximum threshold that can not be exceeded by the technician’s manual control. The minimum level is set by the dimmer channel, so the technician can vary the output of the fixture between these two values. Of course this special mode specifically concerns followspots, but the menu is the same in all the new Juliat LED fixtures and nothing prevents its use in them. The first menu obviously also comprises, in addition to the address, the intensity level and the selected DMX control mode.
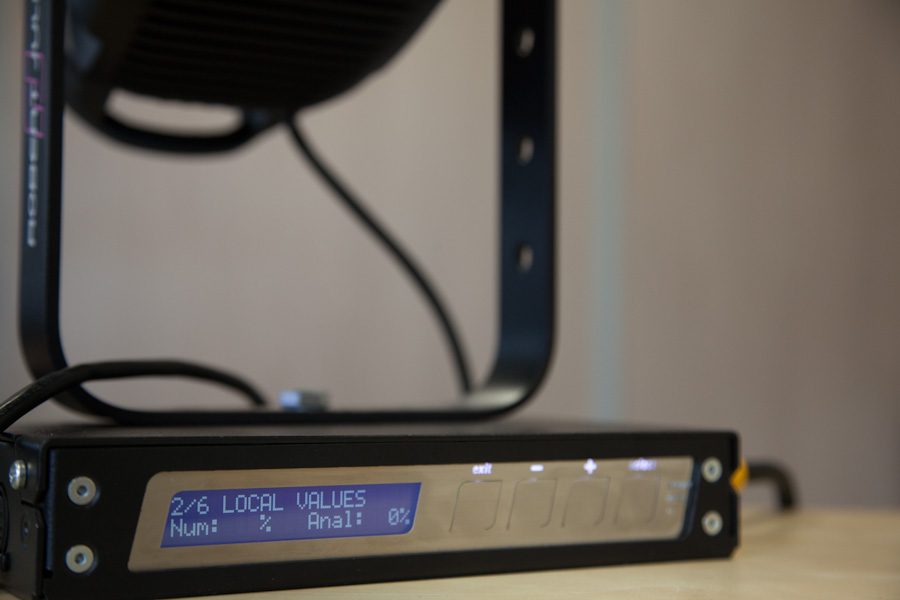
A second menu provides local values. A dimming adjustment can be made and directly stored via this menu.
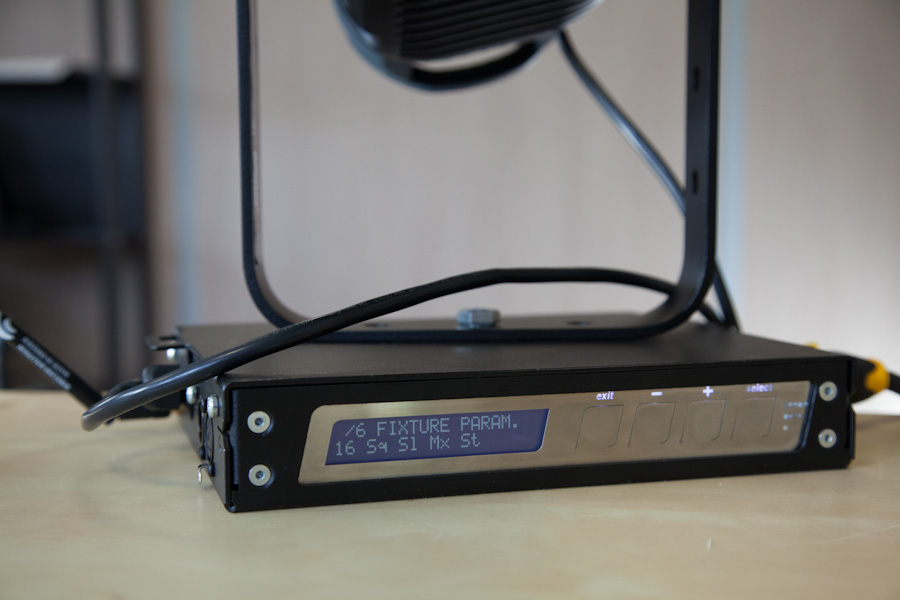
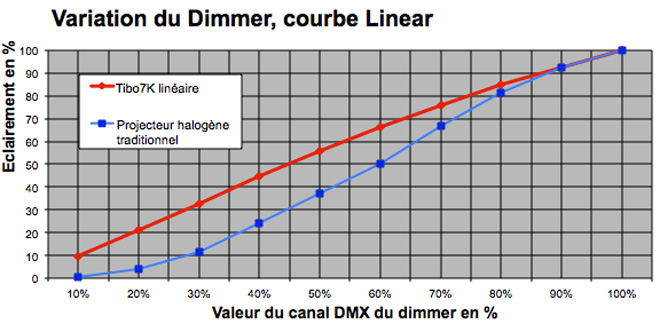
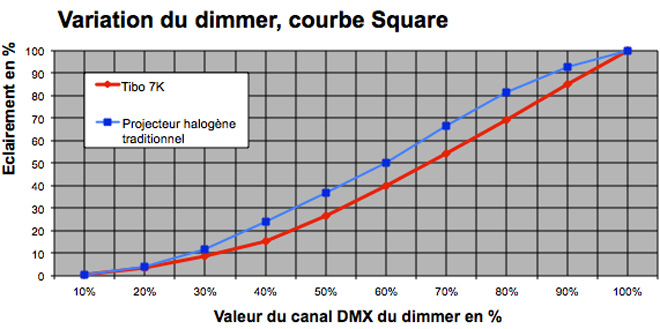
The third menu sets the various options: the resolution of the dimmer in 8 or 16 bits, and then the dimming curve. Two choices of dimming curve are available: Linear, which is very strict, or a curve (Square) that closely simulates the performance of a halogen source.
The smoothing of the intensity curve is also a very noteworthy parameter, the “smoothing” allows you to simulate the fade of a tungsten source. With Smoothing in fast mode, the fading is like that of a 600 W halogen lamp, in slow it is like that of a 1000 W, and in without , there is no fade at all between different intensities.
Flicker mode, which is also adjustable, controls how the switching power supply works, influencing the flicker of the LED source (which is anyway only visible to a camera or a bionic eye). The PWM (pulse width modulation) mode creates a continuous signal (the value of the dimmer in this case is what interests us) from a cyclic signal, here at the frequency of 23.8 kHz. This mode is very accurate but can generate flicker if the frequency of the video camera proves to be a multiple of the carrier frequency or vice-versa. “Free” mode drives the LED with a constant DC current, so it will not cause flicker, but it offers little precision at low intensity and the LED source is effectively switched off until the dimming level reaches 5% intensity. The “Mixed” mode reconciles these two worlds by automatically using the PWM intensity control from 0 to 15% and Free mode from 15% up.
The strobe, which can be enabled or disabled in the following parameters, synchronizes directly to the DMX frame. The advantage of this is that all Tibo fixtures will coordinate perfectly. The downside is that this creates a hectic time in searching for the right frequency on the console. The frequency range of the strobe is very wide, variable between 1 Hz and 55 Hz.
You then choose the “followspot” options by enabling the master mode and analog control.
The last parameter can be used to calibrate the fixture to the rest of the lighting rig. If it is more powerful than others (if it has never been used, forgotten in the warehouse) you can limit the maximum output on a peculiar scale with 32,767 steps (now, that is accurate). This is not simply a limiting threshold, as the embedded processor calculates all the dimming curves with this new maximum value.
The fourth menu contains a lot of fixture monitoring information: LED and PSU hour counters, operating voltage, temperature, fan speed etc. Beside each of the values in the monitoring information, since none of us ever knows the limits of these by heart, a small symbol appears – “OK” or, if there is an anomaly, “NOK” – to qualify the reading.
It is also from this menu that the user can reset all factory settings.
The final menu is used only to activate the WiFi.
Finally, for instant assessment, a system status indicator provides information in real time. When this one is green, a DMX signal is being received correctly. If it turns red, there is a problem receiving DMX or a system fault. The presence of a wireless DMX signal is indicated by a specific logo.
Measurements
Having received three versions of LED Tibo – cool white, neutral white and warm white – we decided to put one of the three to the full bench test, the cool white version, and perform flux measurements on the other two at a beam angle of 20°, for comparison.
Depending on the source used (LED, tungsten or discharge) the luminous flux is completely different – which is quite logical – but so is the power consumption. It seems more appropriate to speak in terms of efficiency (the ratio of electric power to light output) and also include the parameter of color temperature. The Tibo LED cool white version is the equivalent of an incandescent profile fixture with a Lee Filter 201 or 202 gel. With this in mind, we can properly assess the following:
Tibo 533 Cold White 6500K
Derating
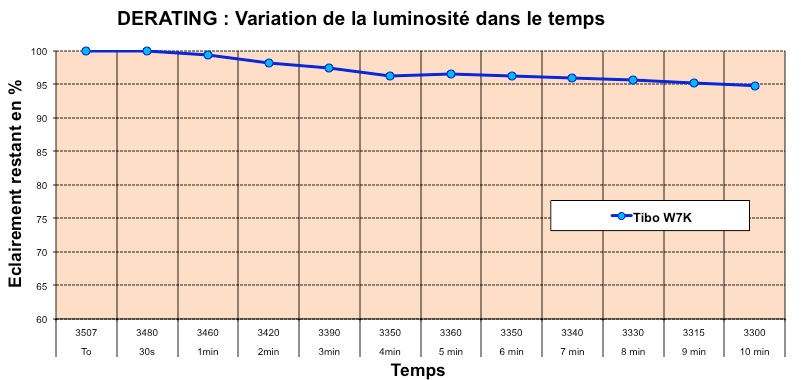
As with all LED sources, the phenomenon of “derating” should be measured. The drop in luminous flux of the LED after several minutes of operation at full power here is perfectly controlled.
The attenuation does not exceed 6% during the first 10 minutes before a perfect stabilization of the flux, indicating efficient cooling and a high-quality power supply.
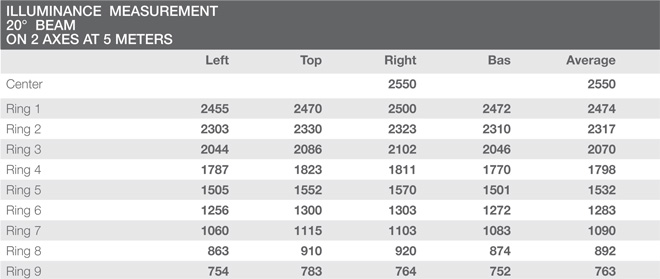
Tibo 533 cold White 6500K – tight beam measurements
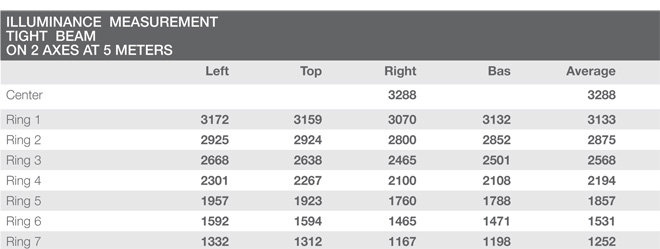

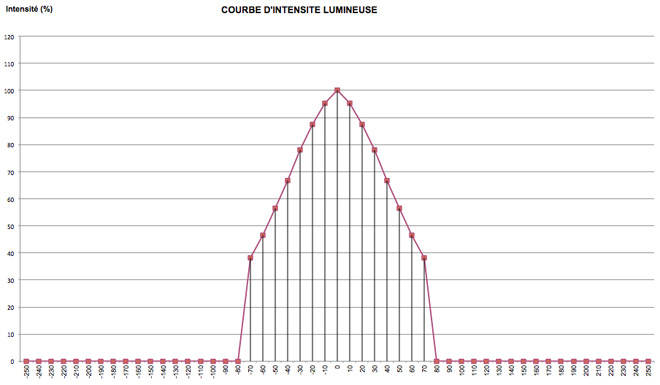
In tight beam, without the removable lens, we calculate a field angle of 17°, slightly higher than the 15° figure indicated by the manufacturer. The field is homogeneous, with a slight hot spot cone, and a luminous flux of 3300 lumens.
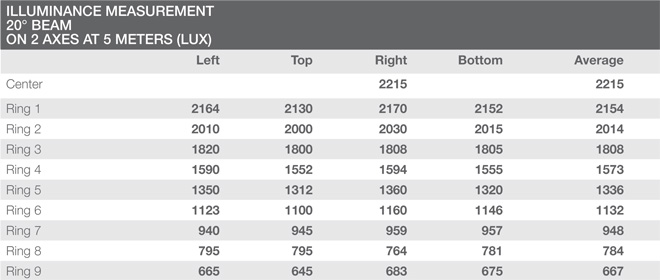
Tibo 533 cold White 6500 K – wide beam measurements
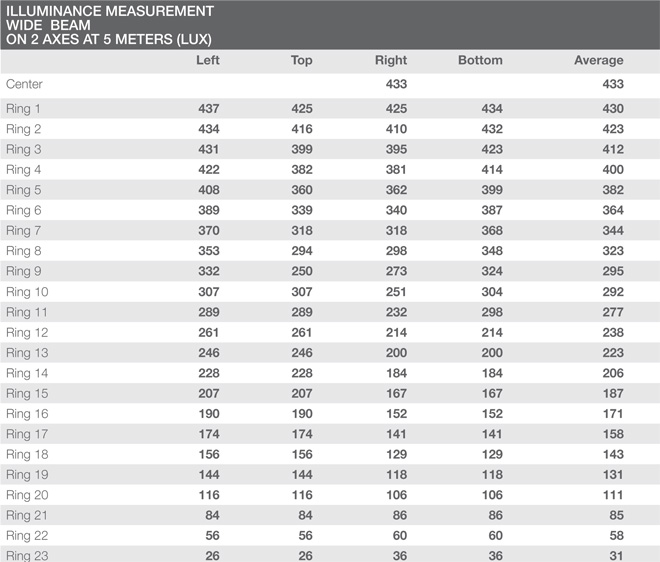

In wide beam configuration, with the removable lens installed, we get a beam angle of 52°, or 7° better than reported by the manufacturer who, doing no harm, prefers to leave a margin of security. The beam covers well and, except for two small irregularities in the region of 30°, where the transition occurs between the two lenses, it is homogeneous. The output then stabilizes at 3100 lumens. Over the entire zoom range, with or without the secondary lens, the light output does not change more than 13%, a very good average.
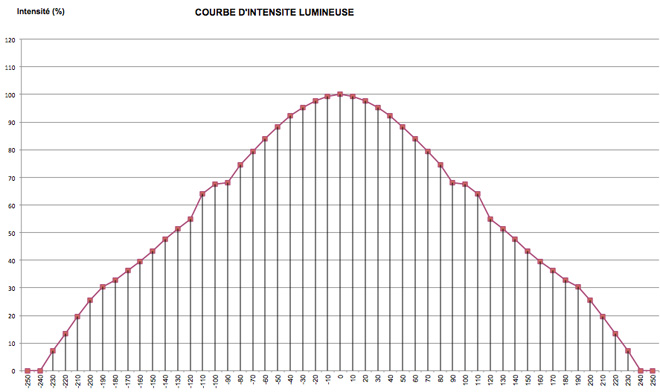
Tibo 533 cold White 6500K – 20° beam measurements
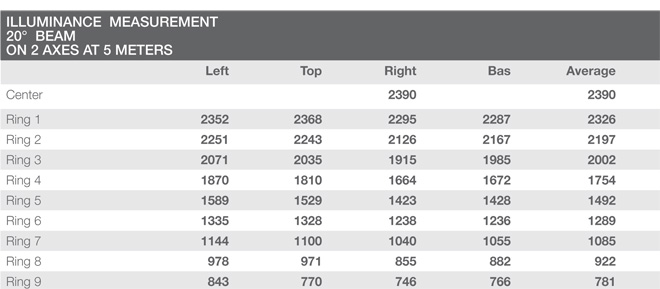

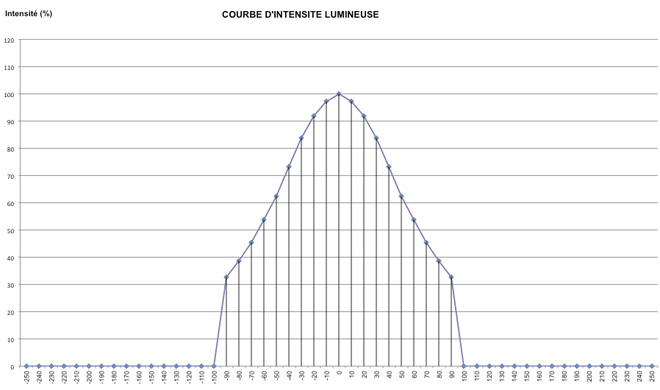
Using this profile at 20°, we measure a luminous flux of 3600 lumens, with a very uniform beam and a present but stable hot spot.
Tibo 533 Neutral White 4000 K – 20° beam measurements

The output measured at 20° is almost identical between neutral white and warm white. We get 3630 lumens and this beam, too, is very uniform.
Tibo 533 Warm White (3000 K) – 20° beam measurements

The Tibo in warm white differs from the others only for its lower luminous flux: 3180 lumens. This is explained quite simply by the additional phosphor layer deposited on the LED in order to obtain warm white.
Lastly, a fourth Tibo will be available, with white from 2700 K to 5700 K variable directly via DMX. It was not available at the time of the test.
Performance comparison
By analyzing these results more precisely, we can determine the efficiency of the light output, which ranges between 42 and 46 lumens/watt.
For comparison, a 614SXII profile fixture produces a luminous flux of approximately 5500 lumens, for an efficiency of only 6 lm/W. The luminous intensity is much higher than that of the Tibo, but if you use this fixture at a daylight color temperature, in most cases by adding Lee Filter 201 gelatin, the flux of your halogen profile then falls to around 2000 lumens, which is 45% less than the Tibo with a cool white source!
As for the Tibo warm white (WW), it is easily comparable to a 600 W halogen profile.
Thermal and acoustic measurements.
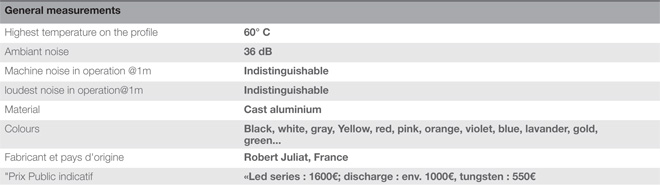
The Tibo LED fixtures use a unique fan with circular blades that is completely silent. Forced ventilation is activated automatically, according to the junction temperature of the LED. In case of overheating, the power supply to the diode decreases progressively.
The power supply itself does not require cooling.
Thus the LED fixtures remain absolutely silent, as required in theaters.
Use
Dimmer
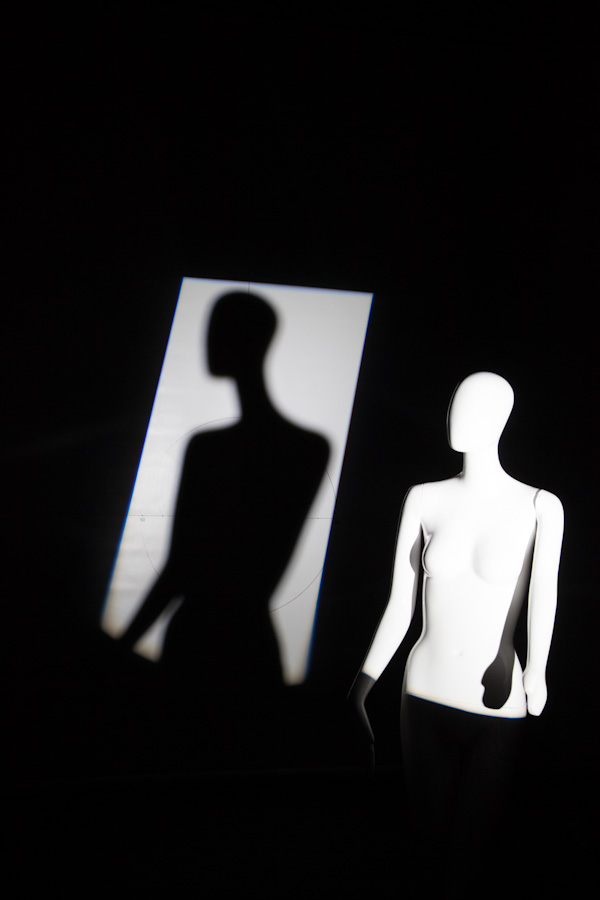
The quality of the LED source is undeniable. The beam obtained is pure and coherent, the slightly “synthetic” rendering of the LED being barely noticeable. The hot spot is present, as with any profile fixture, but it is diffuse. As always with Robert Juliat, the optics are of high quality. Despite its budget price and small size, the projection is clean and flawless, although not reaching the perfection of an SXII. From the console, the wide selection of levels, curves and inertial dimming allow for precise control and a striking similarity to halogen spotlights, especially in “square” mode. Subjectively, what is the most surprising is the absence of color variation with varying intensity. The beam doesn’t become more red at low levels, much to the dismay of tungsten aficionados.
Focus and zoom
In this very nice design, the handling of the fixture has not been overlooked. The regular user will find everything he is accustomed to: the knobs tighten rapidly and reliably, and the fixture is well balanced.
The zoom and focus settings lose a bit over the operating range, and become a little more rough. The removable lens for a double focal length range is a good idea, even if the piece remains in your hand and must be dealt with, once removed. Some drawbacks include the absence of a reference index on the focusing slides, and sharpness is sometimes difficult to achieve at the extremes of the zoom range, reminding us that, in designing this profile, the manufacturer had to find a compromise between sophisticated technology and a price that would be accessible to the majority of theaters.
Shutters and gobos
The advantage of the LED source is the almost total absence of heat in the projection head. Gobos offer good accuracy and excellent durability, even plastic ones.
The shutters are easily handled. The focal range is very fine, but pay attention to wide zoom settings. The insertion of the shutters makes it possible to position them sharply. We can thus obtain rectangular, but also triangular or trapezoidal shapes. The head offers 360° rotation with very rapid locking.
Control
In addition to DMX and manual operation, a WiFi option is also available. The system is developed by Wireless Solution and responds perfectly. It is possible to have the first fixture receive the WiFi signal and then transmit DMX via cable to other fixtures.
If you intend to use the RDM protocol, you should be aware that it is compatible with the hardware, and that a software update (provided by service centers only) will soon enable full compatibility.
Construction
This spotlight is assembled from complete modules, allowing a fairly easy conversion between LED, tungsten and discharge sources, but also simplifying maintenance. Manufacture and assembly is 100% French, just like Cancoillotte. The body of the unit is composed of two half-shells of aluminum alloy, fixed with self-tapping screws for an optimum fit. The forward and rear lens holder, the whole shutter block and the main lens are common to all the profiles. All of the handles and knobs are captive. The lens is easy to access for cleaning.
The LED unit is more specific. As we have seen, it requires a remote power supply, which is specific to each type of LED. This is therefore a unified assembly, permanently connected by a specific cable and that can not be separated by the user. This fanless switching power supply complies with architectural lighting standards. It offers soft start that prevents current inrush, so the 85 W maximum will never be exceeded, not even at power up. Up to 35 units can actually be powered by a single standard 16 A circuit. The LED unit is inserted into an ellipsoidal ventilation apparatus and projects its light output through a system of treated dual condensers, through an aspheric and then a biconvex lens element.
Verdict
Robert Juliat has completed its range with an excellent small, auxiliary profile, able to squeeze into any spot and provide formidable efficiency. It is coupled with a comprehensive and unique modular concept, albeit at the cost of optics that are less perfect than their bestseller traditional range. The LED source, with its advantages in terms of weight, performance and low power consumption, can also upset habits a bit, forcing the user to go through a DMX network and have knowledge of menu use, but these are minor inconveniences, considering the advantage of being able to eliminate a good portion of the heavy electrical systems and dimmers.


