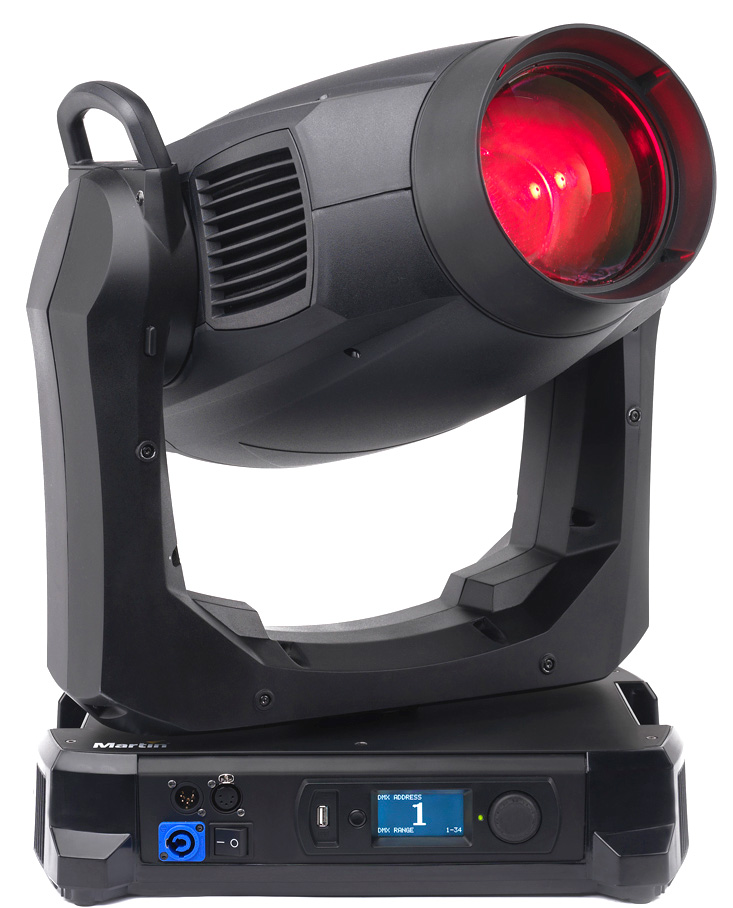
Moving-head spot luminaire with 1000 W HTI lamp

Martin Mac Viper Profile. The Return of the King

This paper is available in Français too

Martin Mac Viper Profile

It is the new revolution of the season, a Martin moving head, a true spot with a blessed 1000 W discharge lamp, gobos, CMY color, zoom and functions like the good old days of this breed of projectors that we believed to be extinct. It has a rock star name and the stature of a workhorse; it is a deadly viper and a legion of 5000 units has already marched out of the factories. It’s all here and, more than anything else, it represents a resurrection.

Mac. Three letters, the symbol of an entertainment industry so young and so rushed that it disowns its products at each evolution. Many of these moving heads have been produced by the Martin company, acclaimed for their products but denigrated over the years by the battering of fierce competition in a marketplace that is ultimately so tiny and so volatile. And yet the MAC600, MAC2000, MACIII, MAC700 and others remain, in their own ways, universal symbols. Symbols of democratization, dreams of accessibility for generations of lighting designers, despite their faults. Technology does not always focus on the purity of a beam, and this is unfortunate. And then, one morning, Martin’s engineers redesigned show lighting, the accuracy needed to illuminate actors, costumes and sets, the delicacy of a beam landing on a dancer, the purity of colors playing with a band, the power of an explosion of light at the grand finale. That’s when the Viper project was born. In spite of its garish name, this spot is probably the best product to come out of Martin to date. And Viper will undoubtedly also become a new symbol, and rightly so.

Handling and ergonomics

It sits proudly on its base, and so do I, as some old pains were awakened on that rainy day by transporting it from the car of Jérôme Garnier, technical director of Martin France (whom, by the way, I wish to thank for his availability). It weighs quite a bit… 37.2 kg precisely. Although this is 15 less than its big brother, the Mac III, from which it inherits certain features. Among these features are the second pair of handgrips, located above the arms of the yoke, that are very useful for moving it. However, the era of big and stocky seems to be coming to an end, as the competition presents machines with equivalent outputs in very small chassis and very light materials. I would not like for Martin to stop using a robust and durable construction, but I would not want to hang this fixture from a truss by myself.

Advertising
Robert Juliat


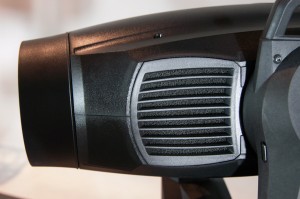
The enormous vents.

The enormous vents on the head require the replacement of air filters, the foam inserts behind the grilles, in the case of excessive dust entry.

So, I take a look at it: a squat base, angular arms and a massive head that is pointed like a missile. The Marketing department gave it the name that could be an action movie title and the designers dressed it up in high-tech armor. Enormous air vents scar its cheeks and the slightly grainy, flat black paint make its skin seem to be granite. This is as impressive as it is disquieting. Like a custom car, it gives the impression of playing one-upmanship.

I look again. The lens of the optical group is remarkable: a large, delicately polished diamond. This can produce a superb output beam.

The construction is solid, the workmanship excellent, the weight a guarantee of quality. The handles, though they are not the most comfortable, allow easy handling in all circumstances, though always with four arms. A single lock on the tilt facilitates servicing and stowing in the flight case.

I finally give up on the pan lock – a useless and irritating device – when the damned latch refuses to budge.
Under the base, eight 1/4-turn, threaded sockets for omega brackets are arranged in a hexagon. Parallel, perpendicular or at 45° to the base, there are plenty of options for the brackets: this is good. An arrow designates the “front” of the fixture, strangely located on the side with the cable connections.You will have to choose between respecting the direction of suspension and discretion of cabling.

Attachment of the safety cable is also carried out from below, in a dedicated recess that is too small: this is not so good. Particularly negative is the fact that the very thin feet will allow the Viper to sink to the floor if you deploy it standing on the ground, forcing you to unhook the safety cable to keep it from wobbling.

The front of the base with PowerCon, XLR5 and USB sockets.

The front of the base with PowerCon, XLR5 and USB sockets.

Proceeding to the base, we find a bare black slab which hosts a PowerCon connector for the power supply, two genuine male and female DMX sockets, the display, a button, an encoder knob, a status indicator and a USB interface for updates.
Everything is accessible, I do not ask questions. I go to the menu and take out the very impressive manual: two extremely detailed volumes in French, 66 pages long, with diagrams and photos in support.
All I have to do now is follow the recipe. The navigation is extremely simple. You press the knob to enter the menu, you rotate it to scroll to the correct functions, a second press enters editing, another turn of the knob changes values, and a last press confirms your choices.

The shortcut menu.

The shortcut menu.

In case of error, or to go back one level of menu, there is an “escape” key. This menu functions on battery power, the “escape” key, in this case, activates the display with the power off.

Shortcuts are implemented in a special menu, which is accessed by holding down the indispensable “escape” button for more than two seconds. The display proposes three selections: a general reset, a lamp On/Off and rotation of the display orientation. I appreciate the simplicity.
The status LED provides continuous information on the “health” of the unit. Green: don’t worry; amber for warnings, red for an error. If, in addition, the LED is flashing, this indicates that a DMX signal is not present.

Menu and Service

I hold the knob down a little long and the menu displays the most useful information for me. Pleasant surprise.

What I expect from an info menu, no more and no less.

What I expect from an info menu, no more and no less.

The Viper menus. You will not get lost.

The Viper menus. You will not get lost.


I click the knob and it passes to the various menus. The most common are grouped in the “MAIN” section. DMX address, control mode selection between basic and extended, fixture ID (of which interest is limited to the management of a single fleet, a kind of serial number), reverse pan/tilt, movement and effects speed (choose SLOW in order to be precise in long-throw applications), lamp striking control, lamp off and reset from the console, and restore the factory default settings. Known by heart to all Martin users. I focus on a few, more specific functions.

The square dimmer curve.

The square dimmer curve setting ensures fine control at the low end of the range

The S curve successfully simulates the dimming of a halogen lamp.

The S curve successfully simulates the dimming of a halogen lamp.


There are four selectable dimmer curves. The linear curve provides linear variation proportional to DMX values and, therefore, overly mechanical results. The “square law” curve allows a finer adjustment at the lowest levels, the “inverse square law” allows more at the highest and, finally, the S-curve (VRMS) – the default mode of the unit – simulates halogen dimming as closely as possible.

The Viper has been equipped with a welcome autofocus feature. If the coupling zoom/focus were guaranteed over the entire projection distance, there would probably not be a selection to deactivate this in the menu. But the autofocus only works on one of the three following areas, configured using the console: from 5 to 10 m, between 10 and 20 m, and from 20 m to infinity.

A true milestone introduced by Martin, the famous animation wheel, undergoes a significant change, probably for reasons of space. Installed on the fixed gobo wheel, it occupies more than half of it. To (further?) restrict its use, the parameter “Gobo 3 FX range” limits the movement of this combined wheel only to gobos or to a part of the animation.

The “effect shortcut” allows you to avoid passages through the open position of the gobo and color wheels.

The display can be oriented in any direction, or can be left to rotate automatically.
The “Information” menu reveals the operating time, number of lamp strikes, software version, fan speed, temperature and unique RDM ID.
A DMX tester is included, accessible from the “DMX Live” menu. In addition to the numerical values received by each parameter, the quality, the refresh rate and the header (the code that tells automated fixtures that the received signal is DMX512 lighting management) of the DMX signal are analyzed.
Finally, the “Test” and “Manual Control” menus complete the user functions.

For qualified service centers, other settings are available in the “Service” menu. Authorized or unskilled users can disable, adjust or calibrate various settings. Updating the software is possible via a USB flash drive or using a Martin interface and a technician trained in the procedure.

Even before powering up the unit, I have the impression of having a fine vintage in front of me. Materials, finish, ergonomics, menu, nothing was left to chance. It possesses features, inherited from 15 years of Danish development, which may annoy some, but it can be completely configured intuitively and quickly. Its mouth alone will allow it to invade the scene and, apart from its slightly excess weight, technicians will be delighted.

I configure the Viper in extended mode, with normal speeds, the dimmer in S-curve, the autofocus engaged and with the animation and effects wheel limiting disabled.

It is RDM compatible. This protocol allows bidirectional exchange of information or commands through the DMX cables with many fixtures developed in the last three years. Investing in a tester or RDM compatible console, the majority of the settings can be done by a single person sitting down, warm and with a cup of coffee . Otherwise, invest in a comfortable harness.

Martin France has left nothing to chance. In addition to supplying the Viper, Jérôme Garnier accompanies me throughout the startup and provides me with the libraries suited to my console. This saves me valuable time.
I turn on the power switch. I was expecting a slightly long start-up. 82 seconds, it’s reasonable. Somewhat surprising are the first twenty seconds during which nothing seems to happen; presumably the time it takes to wake up all the processors. I strike the lamp. A quirk that I attribute to my test unit, I lose the pan and tilt control for the long ten seconds it takes to finish the lighting of the lamp.
Finally at full power, I start the measurements and …

Tests and output measurements

The very moment I power on the Viper, my eyes meet the stars: an impressive luminous power with the purity of ice. My eyes are not sufficient, so I’ll let the numbers from the photometer and optical calculations do the talking.

Tight beam

Illumination measurements for the tight beam

Illumination measurements on 2 axes at 5 meters for the tight beam

Flux measurement for the tight beam

Flux measurement for the tight beam

Illumination curve.

Illumination curve, tight beam.

The tight beam, an aperture of 9.5°, measures 54,500 lux at the center, with a very discreet hot spot. Therefore (I’ll spare the tedious calculations), 26,500 lumens of luminous flux.

Wide beam

Mac Viper, wide beam.

Illumination measurement on 2 axes at 5 meters for the wide beam.

Flux measurement for the wide beam.
Mac Viper, illumination curve.

Illumination curve for the wide beam

At minimum zoom, I multiply the beam aperture by five to achieve a reasonable 44.6°. The light source opens up with exquisite precision, allowing the unit the luxury of providing an almost perfect uniformity of luminous flux over the entire zoom range, to achieve 25,200 lumens.

20° angle

Mac Viper, illumination measurements for a 20° angle.

Illumination measurements on 2 axes at 5 meters, for a 20° angle.

Flux measurement, 20° angle.
Mac Viper, profil du faisceau 20°.

Illumination curve for a 20° angle.

With the red collar, the furtive smoothing filter.

With the red collar, the furtive smoothing filter.

To give some context for comparison, the Viper reaches light levels normally reserved for the 1500 W “caste”. The only downside to this avalanche of photons, which I also attribute to my test unit, is a slight pumping effect of the lamp. Honestly this is nothing discernible to the eye, it would undoubtedly go unnoticed without our light meter.

Be careful though, fellow console operators, there is an additional parameter for smoothing the beam hidden in values from 135 to 139 on the Control channel (set it to 140-144 to disable this), the effect of which, however, deprives you of 12% of the luminous flux at the output.

Movement, thermal and noise limits

The Viper is massive, buttressed by its muscular arms. The pan and tilt movements don’t suffer because of this. Like a heavyweight boxer, it moves quickly with great fluidity. In normal mode, it will make a full turn on itself in 2.7 seconds. It will reverse its head in tilt in 1.7 seconds. In “Fast” mode it gains 0.2 seconds per turn. It has a 540° pan range, a turn and a half, and a 268° tilt range (this is accurate), allowing all current sequences. I once again appeal to the excuse of this being a demo unit – the very first series submitted to the ferocity of relentless testing by future users – in reporting a very noticeable growl at the start and stop of movements on the pan axis.

The movements of the optical group are impressive. The uppercut of the zoom opens in 0.5 seconds. The jab of the iris slams in less than 0.2 seconds This fighter doesn’t pull any punches on calls for gobos or colors, either. Ferocity has a price, for it heats up somewhat: 40° C ambient temperature up to 150° C at the hottest point behind the lamp. The mechanical parts sing sweetly: +7 dB with respect to ambient noise when in standby, it grumbles at +18 dB when we use all the motors continuously (measurements taken at 1 m from the unit).

In the case of a KO (or, more appropriately, a TKO), a hard reset will get it back in the ring in 1 minute and 20 seconds. Allow ten seconds more to re-strike the lamp, it will not do it automatically.

Impressions and performance

Dimmer

Mac Viper Profile. The blades of dimmer.

Mac Viper Profile. The blades of the dimmer. Smile, it's Halloween.

The dimming is done mechanically via the closure of two “crocodile teeth” blades, also known as a jack-‘o-lantern smile, obviously located at the extreme of the focal plane.
This gives a very uniform variation of the output regardless of the selected dimmer curve. However, in the first 3% of the dimmer, a focus that is a little out will show a slight dithering, like a cheese grater.

The dimmer shares the same mechanism as the strobe, which is also highly precise There is no bluffing on its setting, nothing but essentially a fixed or random strobe from 1 to 20 Hz, which engages like lightning.

To preserve the lamp and its components, the Viper reduces the lamp power from 1000 W to 800 W when the shutter closes for over 10 seconds. As soon as it reopens, full power is restored.

Colors

Colors have always been, for me, one of Martin’s weaknesses. A little gaudy or too pastel. But now, a real optical group, an exceptional light source and a re-evaluation of the washes of color put me quickly back in my place. There is no iridescence, the selection is wonderful and the colors are bright: I have the impression of holding a painter’s palette.

Mac Viper Profile. The beautiful deep magenta.

The beautiful deep magenta.

Mac Viper Profile. The Cyan.

The cyan, like moonlight.

Mac Viper Profile. The yellow.

Finally, the yellow !


The magenta provides a covering of a beautiful dark lilac, very “musical theater” but intense in luminosity, similar to the Lee Filter 797, the famous Deep Purple.
The cyan is azure blue, slightly turquoise, closer to Lee 132 Medium Blue.
The yellow abandons its canary hue and passes to chick, less green, more amber – very bright too, leaving 80% of the luminous flux intact. The Yellow L010, Lee Filter, comes close enough.

Its three base colors prove themselves to be in perfect balance, allowing sensible mixtures with no inappropriate shading.

Mac Viper Profile. Red like madder root.

Red like madder root.

Mac Viper Profile. An electrifying green.

An electrifying green.

Mac Viper Profile. The cobalt blue of Congo.

The cobalt blue of Congo.


Mac Viper Profile. Half-red applied.

Half-red applied. I swear to you, Instagram (the photo application for iPhone) has not seen this photo!

Thus, mixing magenta and yellow provides a blazing red, close to a Lee 029 filter.
Le vert perroquet est éclatant, copie du Twickenham Green Lee 736.
The parrot green is bright, a copy of the Lee 736, Twickenham Green.

In addition to this, there is the traditional CTO wheel, warming the light to the 3200 K of halogen lamps, which you will also be using appropriately to adjust certain ambers and other pastels. In any case, I recommend it, as the optics permit all kinds of mixtures with no iridescence or chromatic aberrations.

Saturation lovers and image professionals will find the fixed color wheel to be a rainbow of happiness. Pure primaries (blue, green, red), bright secondaries (orange, magenta), a real congo and two essential correctors: a CTB to push the native 6000 K temperature of the lamp towards 7200 K, and a half-minus-green for certain video applications. After sampling these colors, too, you will soon succumb to half-colors, if only for the guilty pleasure of admiring the gradients you can obtain.

Gobos and animation

The most delicate point, undoubtedly the most subjective, is the choice of the gobos and animation effects. Therefore, based on my my tastes, I praise in particular the former and criticize the latter. With such an optic group, the smallest of flaws jumps out at you, as does the best of achievements.

The two rotating gobo wheels offer five each of two types of gobos: breakup and aerial. The first are a mix of the essential – “dots in Space”, “crystal” – and original – “happy”(swirls), “brick it” and “big bones” – while the latter take on a tremendous magnitude through smoke: “Bite it” (kaleidoscope), “sonar”, “symmetrical leggings” and another bearing the sweet name “Too Many Doctors”, which defies description. This renewed image selection brings an incredible visual comfort, high fashion scenic dressing bordering on demented vortex.

Mac Viper. GoboMac Viper. Gobo.Mac Viper. Gobo.Mac Viper. Gobo.


Mac Viper. Gobo.Mac Viper. Gobo.

Mac Viper. Gobo


Let’s turn now to the things that are irritating (to me). The last wheel combines four fixed gobos and a section of the famous Martin animation wheel. Okay, these four gobos allow the creation of some often surprising and interesting combinations when used in association with the other wheels and the prism. I’ll also let you judge my own concoctions in the following gallery; this is better than superfluous descriptions.

What a shame to have so crippled the animation wheel, no doubt for lack of space in the new ultra-compact body. This famous disc, streaked with scholarly manner, revolved endlessly around its axis. This perpetual sweeping, coupled with other gobos and refined through a good choice of focus, gave free rein to our imagination. Like demigods, we raised squadrons of clouds, setting fire to the walls, swelling the slightest ripple into a marine cataclysm. With a bit of time before us, we explored every nook and cranny of this effect like Méliès. All gone, together with this ill-fated effect section; this is the end of our divine visions, the infinite movement is no more. We have passed from roaring waves to windshield-wipers in the mist, from vengeful flamethrower to sputtering cigarette lighter. And the effort of Martin to provide several preset animation functions (metronome, interference, back-and-forth, etc.) on the channel of the FX Wheel reinforces our disappointment.

Fortunately there is the prism. A well balanced, transparent beam multiplier (x4), it magically multiplies any gobo like flowers in spring. It does this with soft and precise rotation speeds, this is arguably the best prism I’ve encountered.

Mac Viper effet prisme sur gobo.Mac Viper effet prisme sur gobo.Mac Viper effet prisme sur gobo.Mac Viper effet prisme sur gobo.


The iris also stands out for its quality. Consisting of 16 blades, it is extremely fast. At its minimum, it cuts into the beam an edge of less than 3°. Embracing simplicity, the parameter of the iris is dedicated exclusively to its aperture, without pulse or other effects.

Focus and zoom

The optics are the real masterpiece of the Viper. The 5X zoom moves from 9° to 43° with a perfect linearity. The very precise focus provides perfect sharpness, even at the widest aperture. The extremely wide focal range allows you to stroll down to the blades of the dimmer and then to calmly go back up beyond the iris. Morphing between gobos becomes a piece of cake.

This time around, Martin tries its hand at autofocus. First, you must select a distance range via the appropriate parameter in the control channel (5 to 10 m, 10 to 20 m, and 20 m to infinity) then perform the focus. It is comfortable (if a bit long when you’re working fast with your console!) with rotating gobos, but fixed gobos or irises still require adjustments depending on the selected zoom. It’s no major revolution, but it is a step in the right direction for the Danish manufacturer.

I conclude with the frost filter. It is truly progressive, it does not at all give the impression of emerging suddenly in the output of the beam. Though it really lacks the diffusion to transform your spot into a wash (for that you should purchase the Viper Wash or BeamFX, or…), it maintains plenty of luminous flux and provides you with lovely edges. It’s certainly not enough to substitute an array of Fresnels, but it could save face.

Under the hood

The construction follows Martin standards. The head covers can be removed by taking out two Torx 25 retaining screws, the safety wires will then hold them on with their quick-release retainer clips, until these are unscrewed.

The architecture is actually very simple, with a light box accommodating the famous Osram HTI 1000/PS – 6000K, with a CRI above 85 and a nominal service life of 750 h. It is installed using the famous fast-fit process, it locks with ¼ turn at the back of the unit, once a single Torx 20 screw is removed.

Inside view of Mac Viper Profile.

Inside view of Mac Viper Profile.

The two large fans and nozzles for cooling the lamp.

The two large fans and nozzles for cooling the lamp.


Two superb, large nozzles (bright yellow) provide direct cooling of the lamp at the heart of the lightbox. A thermal filter protects the internal components from the heat.

The main functions are then contained in two modules. The first of these, removable by detaching 3 connectors and removing two Torx 20 screws, manages the dimmer and strobe functions using two serrated blades. The beam is then passed through the CTO and CMY color mixing flags. Then, on to the smoothing filter.

The projection module.

The projection module.

The second module manages projections. This can be removed from the head by unscrewing two Torx 20, detaching two connectors and sliding the zoom mechanism forward and out of the way. The beam passes through the color wheel. The filters on the color wheel are simply clipped in. The metal, fixed gobo and animation wheel comes next, followed by the breakup and aerial gobo wheels. The gobo holders are clipped to their wheel, while the gobos themselves are held by a spring (except the glass gobos, which are glued). The animation wheel may be changed by taking it off of its hub. The iris mechanism completes the second module.

The fuses.

The fuses.

All the connectors of the modules are labeled on the circuit board and are grouped in one place, next to the zoom, towards the output lens. This is also where the fuses are located. To facilitate operations at service centers, the various control boards are identical.

The prisme and the Frost.

Attached to the moving carriage of the zoom is the prism (in the foreground) and the frost filter.

Installed nearest the output lens, the optical group completes the workings in the head. The moving zoom/focus assembly breaks down into the primary optics, which slide on rails and to which are fixed the prism holder and the frost filter, and the output optics, which are set directly behind the lens of the spot. The rails of the carriages are pre-lubricated with a long-lasting, Teflon-based grease, so no additional lubrication is required.

The maintenance and repair are once again greatly facilitated by the excellent accessibility of the mechanics, as well as by an extremely comprehensive installation manual, entirely in French. For example, it guides you step-by-step through the replacement of the air filters on each side of the head.

Verdict

A star is born. With its egocentric looks, its whims and its idiosyncrasies. Viper, the heir to the Martin throne, has lost its animation gimmicks and lacks forgiveness on the autofocus, but it does not matter in the end. It roars out its light in a dazzling beam and moves like a demon. A model of absolute purity, its optic group gives us a thousand fantasies of colors and looks. It dreams of majestic stages, musicals, rock concerts, of any place into which one can squeeze its athletic frame, with one thing in mind: to stun us with its abilities.

Mac Viper Profile. General characteristicsMac Viper Profile. General characteristics.

Mac Viper. Affectations DMX.

Mac Viper. Affectations DMX.

Crédits -

Text & photos : Tristan Szylobryt

Leave a Reply